Both of these tools use the ZeroG InstallAnywhere installer, which doesn't completely get along with Windows Server 2012. Luckily, there's an easy fix within Windows. You need to set the "Compatibility mode" to run with compatibility for "Windows 7". You need to perform this procedure on the setup.exe file for ITIC (under Install\ITIC wherever you've extracted the install images) and the install_tdiv71_win_x86_64.exe file in the TDI installer directory.
On each file, right click and select Properties.
Then on the Compatibility tab, click the "Change settings for all users" button at the bottom.
In the "Compatibility mode" section, select "Run this program in compatibility mode for:" checkbox.
Select "Windows 7" from the drop down list.
Click OK, then OK again.
And now you're ready to install
UPDATE: You do also need to ensure that the java executable is in your path. If not, it will fail when trying to create the Java Virtual Machine.
UPDATE 2: And it MUST be the Java 1.7 executable in your path. 1.8 will fail.
Wednesday, June 8, 2016
Tuesday, June 7, 2016
Installing SmartCloud Control Desk 7.5.1 Demo Content on ICD 7.6
You can't do it
Use the maxdemo data that comes with the product. Install it initially using these steps:
https://www.ibm.com/developerworks/community/wikis/home?lang=en#!/wiki/Anything%20about%20Tivoli/page/How%20to%20install%20the%20sample%20data%20during%20IBM%20Control%20Desk%207.6%20installation
These steps are supposed to get it installed after the initial install, but I tried twice and failed both times:
http://www.ibm.com/support/knowledgecenter/SSLKT6_7.6.0/com.ibm.mam.inswas.doc/mam_install/t_mam_create_maxdemo_postinstall.html
So if you want demo data, which you do in some number of test/dev environments, simply install it at initial install time. It goes very smoothly.
But you can, mainly, with a little work
Additionally, you will have other problems, such as the following error when you try to create a new WORKORDER:
And there's no easy fix. So the demo data will let you play around with a lot of functionality, but the system is pretty unusable for anything else after you install it.
Add an attribute to the TICKET table
Download the package
Edit the package
Define your local content and Install
Create an XML file called ContentSource.xml in the C:\temp directory on your Smartcloud Control Desk server system that contains the following text:
<?xml version="1.0" encoding="UTF-8"?>
<catalog infourl="" lastModified="" owner=""
xmlns:tns="http://www.ibm.com/tivoli/tpae/ContentCatalog"
xmlns:xsi="http://www.w3.org/2001/XMLSchema-instance" xsi:schemaLocation=" ContentCatalog.xsd">
<catalogItem>
<version>7.5.1</version>
<type>mriu</type>
<name>Enter the name of package</name>
<description>Enter a description of the package here</description>
<homepage/>
<licenseurl/>
<category>Describe the category of the content</category>
<url>file:////C:\temp\TestPackage.zip</url>
</catalogItem>
</catalog>Edit the name and description and the category according to the content that you are installing. Change the file name in the URL to the name of the content pack zip file.Save the file.Copy the content pack zip file to the C:\temp directory on the server.Go to the ISM Content Installer application: System Configuration>IBM Content Installer.Click the New icon.Enter the location of the ContentSource.xml that you created in step 1 and a description. The file name in our example is: file:////c:\temp\ContentSource.xml Click Save.Click the newly created content source.Click the download link to install the content.
You've now got a good amount of demo content
Monday, June 6, 2016
IBM Control Desk for Service Providers
One of the many features of IBM Control Desk that separates it from the competition is its ability to support Service Providers. It does this by allowing you to secure information on a per-customer basis. For this blog post, I wanted to show a couple of multi-customer scenarios in the product. Specifically, I wanted to show a customer-specific user logging in and only seeing that customer's assets. Additionally, I wanted to show a software license being assigned to that customer-owned asset and how it appears. The screenshots associated with those are shown here:
Create a customer named ACME CORP


The Cust/Vendor field is farther down on the page.

Now create a user that is associated with that Person.

Now create a Security Group (SP) with any permissions you want, but specify "Authorize Group for Customer on User's Person record". I only granted Read access to the Assets application. And add your user to this group.

Here I'm logged in as the user, and can only see the one asset associated with ACME CORP.

Here I'm viewing the Licenses (SP) application for Adobe Acrobat and see that a license has been allocated to ITAM1010, which is the asset associated with ACME CORP.

Create a customer named ACME CORP
Now create a Person who is associated with ACME CORP.
The Cust/Vendor field is farther down on the page.
Now create a user that is associated with that Person.
Now create a Security Group (SP) with any permissions you want, but specify "Authorize Group for Customer on User's Person record". I only granted Read access to the Assets application. And add your user to this group.
Here I'm logged in as the user, and can only see the one asset associated with ACME CORP.
Here I'm viewing the Licenses (SP) application for Adobe Acrobat and see that a license has been allocated to ITAM1010, which is the asset associated with ACME CORP.
Friday, April 22, 2016
Configuring ITIC for use with IBM Control Desk 7.6
As shipped with ICD 7.6 (at least on Linux x86 64-bit), ITIC isn't quite configured correctly. When you try to run startFusion.sh, it will complain that it cannot file the main class. The problem lies in the init.sh script. Specifically, you need to change the following line:
FSNBUILD=7510
to
FSNBUILD=7600
Without this change, it's trying to find a file named IntegrationComposer7510.jar, which doesn't exist. In 7.6, the correct file is IntegrationComposer7600.jar.
Another thing to note is the URL of the BigFix server for use with the ITIC mapping is:
https://hostname-or-ipaddress:52311
The easiest way to work around the problem of having one VM on a NAT network and one on a host-only network in VMWare Workstation
The Situation
I have a BigFix environment with a Windows BigFix server on the host-only network, and I've got IBM Control Desk installed on a Red Hat VM on one of the NAT networks. I want to integrate the two for asset management, which requires the Integration Composer, which has to communicate with both servers simultaneously. (We've done an air-gapped integration for a couple of customers, but I wanted to use the out-of-the-box mechanism).
Bad Solutions
Some of the solutions that I considered, but threw out because of the work involved:
Change an IP address
Simply move one server to the other network and then add routes to communicate between different subnets IP addresses on the same network
Easy Solution
I added a network card on the NAT network to the BigFix Windows server. VMWare Workstation quickly suspended and resumed the VM, the adapter was seen, and it got a DHCP address on the NAT network. And then I could communicate between the two machines!
Tuesday, April 19, 2016
Installing IBM Control Desk v7.6 on Red Hat Enterprise Linux 6.6
I just had a difficult time installing ICD 7.6 on RHEL 6.6 and wanted to share one workaround that I used that finally got me around the prerequisite checker failures on Installation Manager.
I've done this successfully in a production environment, but in this case I'm installing this in a VM in my lab that's running under VMWare Workstation, and it's on a NAT network. Every time the Installation Manager runs the prerequisite checker, I kept getting a failure on network.fqdn, even though the hostname was absolutely set to a fully qualified domain name (icd76.mynet.foo). So I started up 'dnsmasq' locally and pointed to my own IP address as my DNS server. That allowed network.fqdn to PASS, but then network.dns would FAIL (!).
Figuring I have my networking configured "good enough" for my small test machine, I simply edited the following files:
PAD_07060000.cfg
PAW_07060000.cfg
in the directory /var/ibm/InstallationManager/bundles/plugins/com.ibm.tivoli.pae.prereq 1.0.1.20157141414/com/ibm/tivoli/pae/prereq/SystemRequirements/unix/ to change:
network.dns=True
to
network.dns=False
And then it worked like a champ!
How did you find those buried files?
If you cd to /var/ibm/InstallationManager/logs and run 'firefox index.xml', you get a great view of all of the Installation Manager log files. In the latest one, the completion message pointed me basically to that directory.IBM's Maximo 7.6 demo site is available
It's here:
It's just Maximo (enterprise) Asset Management, so it doesn't have any of the IBM Control Desk-specific content, but is a good place to check stuff out if you don't have a a local installation running.
Monday, March 14, 2016
How to Convert Remedy Time to UTC TimeStamp
This question came up on the INUG-USERS mailing list the other day, and our own IV Blankenship was the person who came to the rescue:
Question:
Using Impact WebService we capture the Ticket Close time from Remedy.
I observer Remedy sends the datetime in the below format. How to convert
the below format to NetCool UTC datetime format and display in NetCool
Dashboard.
*2016-02-23T20:45:09-08:00 -> with timezone embedded*
Answer:
The Impact ParseDate function is a wrapper for the Java SimpleDateFormat
class (
http://docs.oracle.com/javase/
The problem with your date string is the timezone. SDF and ParseDate by
extension expect it to be (+-)NNNN not (+/-)NN:NN.
Also, you have to escape the T using single quotes.
You did not say if you were using IPL or Javascript, but here is some IPL
that will work and verify that your data is in the expected format.
d="2016-02-23T20:45:09-08:00";
if(d like '(\d\d\d\d\-\d\d\-\d\dT\d\d:\
parts=RExtractAll(d,
'(\d\d\d\d\-\d\d\-\d\dT\d\d:\
tempDateString=parts[0]+parts[
Log(0,tempDateString);
f="yyyy-MM-dd'T'HH:mm:ssZ";
pd=ParseDate(tempDateString, f, null);
Log(pd);
}
else {
Log(0,"Unsupported date format!");
}
Monday, February 29, 2016
GBS IBM InterConnect 2016 Presentation
All,
This is the presentation Anthony Segelhorst gave at IBM InterConnect 2016.
Title: Gulf Breeze Discusses Application Monitoring Using IBM APM and Log Analysis
Link to Google Drive:
Download Link
This is the presentation Anthony Segelhorst gave at IBM InterConnect 2016.
Title: Gulf Breeze Discusses Application Monitoring Using IBM APM and Log Analysis
Link to Google Drive:
Download Link
Thursday, February 25, 2016
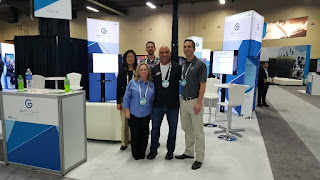
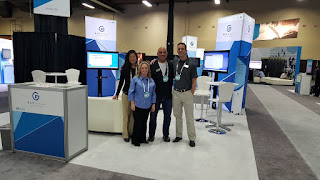
Thank you to everyone who came by our booth at IBM Interconnect
I want to personally thank everyone who came by our booth this week at IBM Interconnect. We got to see quite a few new faces and reconnect with old friends, partners and clients. We will rest up over the weekend then next week we'll start following up on the great conversations we had.
Here are a few of the pictures we took in Sales Academy, the Business Partner Summit and Interconnect itself.


Here are a few of the pictures we took in Sales Academy, the Business Partner Summit and Interconnect itself.


Friday, February 19, 2016
We're in booth 169 at IBM Interconnect 2016!
Stop by to say hi and to talk about how we can help your ITSM project be successful.
Tuesday, December 15, 2015
IBM Cloud Orchestrator Content Pack for Docker Containers
Here's a great video from IBM showing how to use the ICO Content Pack for Docker Containers:
Tuesday, November 10, 2015
ICO 2.5: Azure deployment
Here's a video I created going over some of the details of deploying through IBM Cloud Orchestrator 2.5 to the Microsoft Azure cloud.
Monday, November 9, 2015
Using a certificate with an Azure deployment in ICO 2.5
The ICO 2.5 documentation clearly states that you cannot create a service that uses certificates from ICO, and that is still true. HOWEVER, you can deploy into an EXISTING service that has a certificate associated. The trick here is that you have to first manually create the service in Azure, then manually attach the certificate in Azure. Then when you select the "Deploy cloud service into Azure region" Self-Service option, select the "Use an existing Cloud Service" option.
Friday, November 6, 2015
ICO 2.5: Deploy LAMP stack additional requirements
Once you get ICO 2.5 up and running, you'll have a few self-service offerings available in the dashboard, including "Deploy LAMP stack". This offering requires just a couple of additional configuration steps in addition to the documentation to get it to completely work.
1. You MUST have a flavor named "m1.medium" in your project and it must be large enough for your image named "linux_img".
2. Your linux_img needs to have the yum repositories available that provide httpd, mysql and php. On CentOS and RHEL, these packages are on the base DVD. To provide these to the VMs on my private network, I have these DVDs mounted under a central (private) web server's web root, and have these URLs configured in the appropriate /etc/yum.repos.d/*.repo files on my linux_img image.
3. The MySQL expects to have access to the file named:
/tmp/mysqlinstaller/world.sql
It runs this SQL script during install. You can download this file from
http://downloads.mysql.com/docs/world.sql.gz
I simply placed this file on my image so it's there for every VM created.
That's it.
A feature that I would love to see in OpenStack
A graphical user interface for the commands.
Yes, Horizon is pretty nice, but there are lots of things that it doesn't allow you to do. Additionally, the CLI commands are pretty intimidating. Here's the documentation for the current release: http://docs.openstack.org/cli-reference/content/openstackclient_commands.html . Notice how each command has at least 20 options, each with its own flags, etc. And Horizon doesn't actually call these commands. It uses the REST API (and/or other API), which is completely separate.
So what I'd like to see is something graphical that lets you first pick a command ('nova', 'glance', etc.), then you have a drop-down choice list for the next parameter, and the next, etc. Many of these commands require output from other commands as their input. So the idea would be that the interface is running each of the required commands to build the appropriate list of options. And after building the command, this tool could output that for you to use in scripts, etc.
If it was an easy task, it would already exist, and it doesn't. There's also quite a lot of movement in the code, so keeping this tool up-to-date would be quite a challenge. But I personally think it would be worth it.
ICO 2.5: Where does the heat template for the "Deploy LAMP stack" come from?
ICO 2.5 comes with a few samples in the Self-Service Catalog, including one named "Deploy LAMP stack" (under "Deploy customized cloud services"). Once you have your linux_img image configured correctly and your linux_key key pair created, you can request this offering to deploy a LAMP stack among three machines: Apache, MySQL and PHP. I found the heat template command logs on each machine in /var/log/cloud-init-output.log and /tmp/install.log, and wanted to find where exactly that template was coming from. It took me far too long to find it because it's an inline string in the JavaScript code that can be seen with Business Process Designer. Specifically, you can find it in the Embeddable
Deploy Lamp Template service in the SCOrchestrator OpenStack Services toolkit,
in the Build Parameters element on the diagram, here:

You can see it in the green text as part of the "Implementation" in the bottom panel.

You can see it in the green text as part of the "Implementation" in the bottom panel.
ICO 2.5: Creating a Red Hat 6.5 image with Gnome for use with a VMWare vSphere cloud
Introduction
When creating your private OpenStack-managed vSphere cloud, you're going to need some "images" ("VM Templates" in VMWare terminology) so you can launch/deploy instances. The really sticky part about this configuration is that OpenStack has traditionally only supported the KVM hypervisor, which uses a different disk format than VMWare (KVM uses QCOW2 and VMWare uses VMDK). I found some great QCOW2 images here: http://docs.openstack.org/image-guide/content/ch_obtaining_images.html and some great CentOS VMDK images here: http://osboxes.org. I had some different hurdles with each of those and finally decided just to install RHEL 6.5 from scratch, then modify that VM to work, then create a VM Template that would be automatically discovered by OpenStack as an image. In this post I'll cover the highlights of this technique.Install Red Hat
Install the "Desktop" option. This will mean that you have to do a little cleanup later, but I'll cover that.
Install VMWare Tools
Go ahead and install VMWare tools just to make your life a little easier.
Configure Yum Repositories and Install Packages
If you're using Red Hat Subscription Manager, you don't have to go through these steps. If you're not using RHSN, you'll need to manually configure some repositories. I found for this exercise that the CentOS repositories, along with the EPEL repository, worked great. To configure the CentOS repositories, create a file named /etc/yum.repos.d/YOU_PICK_A_NAME.repo with the following contents:
[base]
name=CentOS-6 -
Base
mirrorlist=http://mirrorlist.centos.org/?release=6&arch=x86_64&repo=os
#baseurl=http://mirror.centos.org/centos/6/os/x86_64/
gpgcheck=0
#released updates
[updates]
name=CentOS-6 -
Updates
mirrorlist=http://mirrorlist.centos.org/?release=6&arch=x86_64&repo=updates
#baseurl=http://mirror.centos.org/centos/6/updates/x86_64/
gpgcheck=0
#additional
packages that may be useful
[extras]
name=CentOS-6 -
Extras
mirrorlist=http://mirrorlist.centos.org/?release=6&arch=x86_64&repo=extras
#baseurl=http://mirror.centos.org/centos/6/extras/x86_64/
gpgcheck=0
#additional
packages that extend functionality of existing packages
[centosplus]
name=CentOS-6 -
Plus
mirrorlist=http://mirrorlist.centos.org/?release=6&arch=x86_64&repo=centosplus
#baseurl=http://mirror.centos.org/centos/6/centosplus/x86_64/
gpgcheck=0
enabled=0
#contrib - packages
by Centos Users
[contrib]
name=CentOS-6 -
Contrib
mirrorlist=http://mirrorlist.centos.org/?release=6&arch=x86_64&repo=contrib
#baseurl=http://mirror.centos.org/centos/6/contrib/x86_64/
gpgcheck=0
enabled=0
Then run 'yum repo-list' to verify the repositories were created. Now you can run the following commands:
yum -y epel-release
yum -y cloud-init
yum -y cloud-utils
yum -y
heat-cfntools
Configure Networking
Since the "Desktop" option was chosen, the NetworkManager service was installed and enabled. You need to change that with these commands:
service
NetworkManager stop
chkconfig
NetworkManager off
service network start
chkconfig network
chkconfig network
Now run the following commands so that eth0 will get configured properly:
sed -i '/^HWADDR/d'
/etc/sysconfig/network-scripts/ifcfg-eth0
echo -n >
/etc/udev/rules.d/70-persistent-net.rules
echo -n > /lib/udev/rules.d/75-persistent-net-generator.rules
Configure cloud.cfg
The default configuration will try to contact multiple non-existent IP addresses for metadata, and you don't need that by changing /etc/cloud/cloud.cfg. Add the following line to that file:
datastore_list: [ NoCloud, ConfigDrive, None ]
You *may* also want to set:
disable_root: 0
ssh_pwauth: 1
This will allow you to access the VM as root, and via ssh with a password.
Make a Template
Via the vSphere Web Client or vSphere Windows Client, clone the VM to a template. After you do this, wait a few minutes for OpenStack to "see" this new template as an Image.
Conclusion
Following the above steps should get you a working template from which you can explore the other capabilities of ICO and ICMWO.
Tuesday, October 6, 2015
How to reset your OpenStack services to "Up" in your IBM Cloud Manager dashboard for a vSphere cloud
While trying test and manage components in your vSphere cloud, you may see "Services Down" in some parts of the dashboard. For example, under "Host Aggregates":

I basically found that restarting all of the "nova*" services on my controller to be the answer to this problem.
The one-line answer is to log into your controller node as root and run the following:
for i in `systemctl -a | grep \.service | grep " active"| grep nova | awk '{ print $1 }'`; do systemctl restart $i;echo $i; done
So it's iterating through the results of the 'systemctl -a' command that contain active services containing the word "nova", and restarting each of those services. After you run the above, you should see that it shows "Services Up" for all availability zones on all hosts (since in a vSphere cloud, these services are all running on the controller node, rather than on the VMware nodes themselves).
Thursday, October 1, 2015
There's a new cloud in town, Part 4 How to reset ICMWO 4.3 to reinstall a cloud
After making sure ICMWO (IBM Cloud Manager With OpenStack) had the correct fixpack installed, the installation and configuration of ICO 2.5 succeeded and is working fine. I'm able to deploy individual VMs and Heat stacks to an OpenStack cloud. I've only created a small vSphere cloud, and I believe that's the reason that I haven't had much success getting ICMWOS to work with that cloud (I can launch instances, but those instances can't see their operating system). But I've learned several useful pieces of information through the process. I'll list the most important one here, and I'll write a new post for each of the others.
How to "reset" ICMWO to reinstall a cloud
While you're kicking the tires (or even installing into a production environment), you will certainly encounter the need to try to re-deploy a cloud. This "reset" functionality isn't made available from the GUI, and really involves doing some things outside of ICMWO. Happily, ICMWO doesn't install anything on your vCenter or ESXi servers (the controller uses the appropriate vSphere APIs through the vCenter server to do all the dirty work). So, to reset things so you can re-deploy a vSphere cloud, you need to:
1. Delete and re-create the "controller" node that you previously specified. This is the server that ICMWO deployed OpenStack to. You created this server specifically for this purpose based on the topology requirements of ICMWO. My entire environment is running under VMWare Workstation, so I simply took a snapshot of this VM once I had the OS installed and configured, so I could revert to that snapshot before each successive attempt.
2. Next, you need to delete the TWO Chef resources associated with the controller. There is a NODE and a CLIENT that have been created for the controller. To delete those, you need to run the following two commands (where "vmc.mynet.foo" is the FQDN of the controller for your VMWare cloud):
knife client delete vmc.mynet.foo
knife node delete vmc.mynet.foo
3. Finally, to delete the cloud from ICMWO Deployer GUI (https://icmwos.mynet.foo:8443), you need to log into the ICMWO server (via the console, ssh, VNC, etc.) as the same user you use to log into the Deployer GUI and delete a directory. The name of the directory contains the name of the cloud that you specified in ICMWO when you deployed the cloud and the datetimestamp when it was created. The directory is under:
$HOME/icm/clouds
And the name will be "cloudName_datetimestamp". So to delete the cloud named "vc55" from my GUI, I needed to run this command:
rm -rf ~/icm/clouds/vc55_2015-09-29_173201
And now ICMWO is ready to allow you to try to deploy a cloud to that node. I don't know if this name is stored anywhere else, so the safest route in my opinion is to use a different name for the new cloud.
Monday, September 28, 2015
There's an updated cloud in town Part 3: Reinstalling everything
The prerequisite checker doesn't check the ICMWO fixpack
ICO 2.5 has a great prerequisite check script, but I found out the hard way that it doesn't check to make sure you have the correct ICMWO fixpack installed (fp 2 or later is required). Specifically, what I got was a crash of the script, rather than anything useful. Even after I made it so the script didn't crash, the error still didn't directly point to the fact that I had forgotten to install the fixpack. Here's the failure message I received at the end of the prereq_checker.sh output:
Traceback (most recent call last):
File "/mnt/hgfs/ico25/ico_install/installer/read-params.py", line 347, in <module>
if not validator.validate(param_dict, prereq, log_file) and not os.path.exists("/tmp/skip-checking"):
File "/mnt/hgfs/ico25/ico_install/installer/validator/__init__.py", line 74, in validate
openstackServices.validate(params, response1, messageValidator)
File "/mnt/hgfs/ico25/ico_install/installer/validator/openstackServices.py", line 70, in validate
if not user_response:
UnboundLocalError: local variable 'user_response' referenced before assignment
I edited line 70 of openstackServices.py to allow it to at least complete correctly, and this was the error message at that point:
- Checking that the following services are available: ['cinder', 'glance', 'nova', 'neutron|nova network']
- Status: Failed
- The following services must be available and running : ['cinder', 'glance', 'nova', 'neutron|nova network']
ERROR: The cinder service API is not enabled
- User response: Ensure that the openstack services are available
All of those services were running, but it jarred me into remembering that I hadn't installed FP3. Once I installed the fixpack, the prereq checker script and install were able to complete successfully.
Verifying you ran ICM_config_ico.sh correctly
To verify that you ran the ICM_config_ico.sh script correctly on your servers, open the OpenStack Dashboard (https://openstack_controller) and navigate to IDENTITY->Domains, then click the down arrow far to the right of a domain and select Edit Domain to get this dialog:
Specifically, notice that there are 5 tabs: Domain Information, Domain Members, Domain Groups, Domain Administrators, Quota and Availability Zones. This is how it should look. If it doesn't, you did something wrong in running the ICM_config_ico.sh script. I think my problem was that I ran it twice on my controller - once with the "master_controller" option and once with the "controller" option. I should have only run it ONCE, with the "master_controller" option.
You will need to go to the Availability Zones tab and add the "nova" availability zone to the Default domain.
Also navigate to IDENTITY->Projects and click the down arrow to the far right of the "admin" project, then select Edit project and you should see this dialog:

Notice that it has an Availability Zones tab. Again, that is not there if the scripts didn't run correctly.
And now for the project (similar to the domain above), you will need to go to the Availability Zones tab and add the "nova" availability zone to the projects you'll be working with through ICO.
Thursday, September 24, 2015
There's an updated cloud in town Part 2: Still Installing ICO 2.5
A few more hurdles overcome as I get closer to getting ICO 2.5 installed.
systemctl stop firewalld
systemctl disable firewalld
In my case, it was blocking port 53 (dns), which I needed open to configure the vCenter server (next section). I first just used Applications->Sundry->Firewall to open port 53, then realized that I could just turn it completely off in my test environment so I don't hit any more problems with it.
I didn't want to get a Windows machine involved if at all possible, and it turns out to be fairly straightforward to do this. You will find 99% of the instructions in this great article:
http://www.unixarena.com/2015/05/how-to-deploy-vcsa-6-0-on-vmware-workstation.html
Specifically, the .OVA file can be found in the .ISO file that you download from VMWare. It just doesn't have a .ova extension. So you need to extract the file, change the name to include the .ova extension, and then you're mainly off to the races. HOWEVER, you have to do ONE MORE THING to actually get it working. Specifically, you need to add this additional line to the end of the .vmx file after you import the .ova file:
guestinfo.cis.appliance.net.dns.servers="172.16.30.8"
Some RHEL 7 notes
The firewall in RHEL7 (and 7.1) is not iptables. Instead, it's the firewalld service that's controlled by systemd. I'm not sure which install option causes it to be configured because it wasn't running on all of my RHEL 7.1 systems. Anyway, to turn it off, you can run:systemctl stop firewalld
systemctl disable firewalld
In my case, it was blocking port 53 (dns), which I needed open to configure the vCenter server (next section). I first just used Applications->Sundry->Firewall to open port 53, then realized that I could just turn it completely off in my test environment so I don't hit any more problems with it.
Installing vSphere 6.0 Without a Windows Machine
I decided to also install vSphere 6.0 to use that as a testbed, and that has a few challenges. Specifically, the vCenter Server Appliance (VCSA) no longer ships directly as a .OVA file. It is now an ISO file that you're supposed to mount and run on a Windows machine to remotely install the vCenter Server Appliance on a remote ESXi server.I didn't want to get a Windows machine involved if at all possible, and it turns out to be fairly straightforward to do this. You will find 99% of the instructions in this great article:
http://www.unixarena.com/2015/05/how-to-deploy-vcsa-6-0-on-vmware-workstation.html
Specifically, the .OVA file can be found in the .ISO file that you download from VMWare. It just doesn't have a .ova extension. So you need to extract the file, change the name to include the .ova extension, and then you're mainly off to the races. HOWEVER, you have to do ONE MORE THING to actually get it working. Specifically, you need to add this additional line to the end of the .vmx file after you import the .ova file:
guestinfo.cis.appliance.net.dns.servers="172.16.30.8"
Set the value appropriately for your network. If you don't add this, the VM will start up, but will have the error:
Failed to configure network
And I couldn't find a way to fix that in the VM as it stood. I updated the DNS settings, rebooted the server, did lots of other things, etc., and it still just showed that error. So I knew I would have to recreate the VM from the OVA file, but needed to figure out how to set the DNS server of the VM from the VMX file.
So I mounted the VCSA ISO file on Linux and ran the following command at the root of it:
grep -r guestinfo.cis *
Somewhat amazingly, that came back within seconds and I found all of the settings from the linked article, and then I searched for "dns" and found the above REQUIRED setting.
I didn't have a "good" DNS server on my network, so I quickly created a DNS server on one of my RHEL7.1 systems. It's REALLY easy to do this if you have all of your hosts in the /etc/hosts file. You just need to run the command:
service dnsmasq start
systemctl start dnsmasq
(Edit 9/26: I changed the above command to use the systemd mechanism for starting the service)
And that's it. You now have a DNS server.
I thought that the vSphere Web Client would allow me to just use a browser, but that's not quite right. the web interface requires Flash, and really only supports Windows or MacOS clients. So I've had to bring a Windows machine into the mix anyway.
systemctl start dnsmasq
(Edit 9/26: I changed the above command to use the systemd mechanism for starting the service)
And that's it. You now have a DNS server.
You still NEED a Windows machine for vSphere
I thought that the vSphere Web Client would allow me to just use a browser, but that's not quite right. the web interface requires Flash, and really only supports Windows or MacOS clients. So I've had to bring a Windows machine into the mix anyway.
Wednesday, September 23, 2015
There's an updated cloud in town Part 1: Installing ICO 2.5
IBM Cloud Orchestrator 2.5 was recently released, so I'm installing it in my lab. This new release is based on IBM Cloud Manager with OpenStack 4.3, so quite a bit has changed. This series of posts will discuss some of the issues with installation and overall thoughts as I go through.
If your target machines don't have access to the Red Hat Subscription Network, you can get around this by downloading Fedora 19 and add it as a Yum repository. But the Fedora ISO doesn't include the python-pyasn1-modules rpm. So you'll need to download that and add it to a local repository on the ICM Deployer machine. I used the 'createrepo' command to create the repository under /opt/ibm/cmwo/yum-repo/operatingsystem/redhat7.1/x86_64/optional .
I downloaded the Fedora 19 ISO from here: http://www.itsprite.com/free-linux-download-fedora-19-iso-cddvd-images/
And I downloaded the python-pyasn1-modules RPM from here: ftp://ftp.icm.edu.pl/vol/rzm5/linux-fedora-secondary/releases/19/Everything/armhfp/os/Packages/p/python-pyasn1-modules-0.1.6-1.fc19.noarch.rpm I think a better link is: https://archives.fedoraproject.org/pub/archive/fedora/linux/releases/19/Everything/x86_64/os/Packages/p/python-pyasn1-modules-0.1.6-1.fc19.noarch.rpm
I didn't need any other packages - the Fedora 19 ISO and the python-pyasn1-modules RPM gave my install everything it needed.
Wrong Version of IBM Cloud Manager
IBM Cloud Manager is included in the eAssembly for ICO, but it's not the required level! The Cloud Manager files included with ICO are JUST version 4.3. However, version 4.3 with at least fixpack 2 is what's required. So after installing Cloud Manager, you will need to go to IBM Fix Central to download Cloud Manager 4.3 fixpack 3, which was released after ICO 2.5.Cloud Manager: Additional YUM Repository Needed for KVM
If you're deploying a KVM cloud to Red Hat 7 or 7.1, you will need to enable the Red Hat "Optional" repository to have access to several python packages, including python-zope-interface and python-pyasn1-modules.If your target machines don't have access to the Red Hat Subscription Network, you can get around this by downloading Fedora 19 and add it as a Yum repository. But the Fedora ISO doesn't include the python-pyasn1-modules rpm. So you'll need to download that and add it to a local repository on the ICM Deployer machine. I used the 'createrepo' command to create the repository under /opt/ibm/cmwo/yum-repo/operatingsystem/redhat7.1/x86_64/optional .
I downloaded the Fedora 19 ISO from here: http://www.itsprite.com/free-linux-download-fedora-19-iso-cddvd-images/
And I downloaded the python-pyasn1-modules RPM from here: ftp://ftp.icm.edu.pl/vol/rzm5/linux-fedora-secondary/releases/19/Everything/armhfp/os/Packages/p/python-pyasn1-modules-0.1.6-1.fc19.noarch.rpm I think a better link is: https://archives.fedoraproject.org/pub/archive/fedora/linux/releases/19/Everything/x86_64/os/Packages/p/python-pyasn1-modules-0.1.6-1.fc19.noarch.rpm
I didn't need any other packages - the Fedora 19 ISO and the python-pyasn1-modules RPM gave my install everything it needed.
Monday, July 6, 2015
Loading the SCCD 7.5.1 Demo Content Package into SCCD (ICD) 7.5.3
This tip is specifically for SCCD 7.5.3.
Problem
When trying to install the SCCD 7.5.1 Content Pack into SCCD
7.5.3, you'll get an error about the column named GMAPSDISTANCEMATRIX.
Specifically, the error will state that there is no default value and no values
for that column in the data. The first round of errors come from the Data/SCCD_SI_MAPMANAGER.xml file in the content pack. If you manually download the content pack, you can view the file to see that the data it's complaining about really isn't there. And once you fix the errors found in that file, there are other errors.
Workaround
Since this is just demo data on a demo system, I figured it was OK
to modify the offending Maximo objects, and the modifications worked to eliminate the error and
allow me to go through all of the scenarios. You should be on a demo system, so you should be OK with that stipulation.
To workaround the problem, you need to make two different types of database modifications within Maximo.
First, turn on Admin mode following these instructions:
https://www.ibm.com/developerworks/community/blogs/a9ba1efe-b731-4317-9724-a181d6155e3a/entry/how_to_turn_on_and_turn_off_maximo_admin_mode31?lang=en
Next, you need to mark that the following attributes are NOT required:
BMAPSDISTANCEMATRIX
BMAPSROUTE
BMAPSGEOCODE
GMAPSDISTANCEMATRIX
SPATIALDISTANCEMATRIX
Go To Applications->System Configuration->Platform Configuration->Database Configuration and search for the MAPMANAGER object:

Select the object found and look for the each one of the listed attributes Attribute. You'll need to go to the second page of attributes to find SPATIALDISTANCEMATRIX.

You can then de-select "Required?" flag which will make it a non-required attribute (which corresponds to a column in the database). Once you've done this for the four attributes, click the Save button.
Now open the ASSET object and you need to add an attribute named AMCREW. Go into the ASSET object and add a new row named AMCREW. All of the default values work fine. This attribute won't hold any data - it just needs to be there.

Then go back to "List View" and select "Apply Configuration Changes on the left under "More Actions":

Once the process completes, you should see dialogs similar to the following:

At this point you can successfully install the content pack.
Tuesday, June 30, 2015
IBM Performance Management 8.1.1 is GA!
IBM® Performance Management is a comprehensive solution that helps manage the performance and availability for complex applications that might be running in a data center, public cloud, or hybrid combination. This solution provides you with visibility of your applications, ensuring optimal performance and efficient use of resources.
The Performance Management solution collects data from both Performance Management agents and Tivoli® Monitoring agents. Data is displayed in the Application Performance Dashboard for both Performance Management agents and their hybridized Tivoli Monitoring counterparts.The IBM Performance Management solution has four offerings:
- IBM Application Performance Management Advanced combines IBM Monitoring, IBM Application Performance Management, and IBM Application Diagnostics into one offering.
- IBM Application Performance Management for end user experience, transaction tracking, and resource monitoring of all your application components. Application Performance Management is useful for managing your critical applications in production.
- IBM Monitoring for resource monitoring of infrastructure, application components, and cloud workloads. Resource monitoring helps you identify and address slow transactions, capacity issues, and outages.
- IBM Application Diagnostics for code level visibility into your applications and the health of your application servers. Use the diagnostics dashboards to find performance bottlenecks in application code.
A new piece of documentation included with this release is the Scenarios guide. There is currently only one scenario documented, but it is very detailed and represents the most common scenario by far.
Friday, June 19, 2015
Live Video Presentation: ITM Nugget: Overview of how to retrieve enterprise wide information in one simple output
IBM's Mark Leftwich has made a great video on how you can pull enterprise wide information in one simple step. These techniques and examples are great for audits, sanity checking monitoring and problem diagnosis work:
Thursday, June 18, 2015
A great document from IBM on integrating SCCD processes with traditional Maximo asset management functions
IBM Control Desk (previously named SCCD - SmartCloud Control Desk) is Maximo, but because it provides several additional customizations to Maximo, many traditional Maximo developers are intimidated by it. But that shouldn't be the case. Like other Maximo additions (Maximo for Oil and Gas, etc.), ICD is mainly a collection of additional pages (officially named "applications") that access the same Maximo database that you know and love. It does deal with some different objects (tables) in the database, but it's all the exact same architecture. And while it does add new workflows and a few other things, these are all really just "normal" Maximo customizations. It just happens to be that ICD contains quite a few of these customizations, and that's why IBM packages it as its own product.
Have a look at this paper for more information on the use of automated vs manual processes when dealing with ICD and asset management:
https://www.ibm.com/developerworks/community/groups/service/html/communityview?communityUuid=e25892f0-20f7-46ff-bbe9-c7c03fb3036f#fullpageWidgetId=Wb33da0c91d92_4cec_a8a7_57df877f617b&file=0a07c40d-bb04-4c6d-accc-6f23cb6505d9
IBM's TCR Community
Reporting is an indispensable part of your IT implementation. Check out IBM's Tivoli Common Reporting community for tips, tricks and updates on this tool that's included with nearly all IBM ITSM products:
https://www.ibm.com/developerworks/community/groups/service/html/communitystart?communityUuid=9caf63c9-15a1-4a03-96b3-8fc700f3a364
https://www.ibm.com/developerworks/community/groups/service/html/communitystart?communityUuid=9caf63c9-15a1-4a03-96b3-8fc700f3a364
Thursday, June 4, 2015
DASH Customizations with data from ITNM and TBSM
Jason Shamroski is creating some custom dashboards for a customer this week using DASH, TBSM and a component developed by IV Blankenship for pulling ITNM topology data into DASH.


Thursday, May 21, 2015
Wednesday, May 20, 2015
Tuesday, May 19, 2015
Video - Creating a REST Service with Tivoli Directory Integrator (TDI)
Tivoli Directory Integrator is a truly amazing tool. It has all of the plumbing in place to connect to numerous datasources and to automatically transform endless types of data. Plus it's included with many IBM products. Your company probably owns a license for it, and you're probably not leveraging even a fraction of its capabilities.
Monday, May 18, 2015
Video - Integrating data with SmartCloud Control Desk (SCCD) using TDI
It's a little old, but still absolutely valid. TSRM is one component of IBM's SCCD offering, and it still has the same architecture that it had in 2008. TDI has some new features, but it still has the same architecture and the process is still the same for integration.
Friday, May 15, 2015
Thursday, May 14, 2015
Tuesday, May 12, 2015
Video - IBM Tivoli Network Manager 4.1 New Features
This video is from 2014, but the information is still up-to-date and valid.
Monday, May 11, 2015
Friday, May 8, 2015
Thursday, May 7, 2015
Wednesday, May 6, 2015
Video - Netcool Omnibus : The MTTrapd probe
Another great video from the IBM C&SI Netcool Support team!
Tuesday, May 5, 2015
Monday, May 4, 2015
Friday, May 1, 2015
Thursday, April 30, 2015
Subscribe to:
Posts (Atom)