A little while back Frank posted a blog about increasing the size of a logical volume in Linux (http://blog.gulfsoft.com/2008/11/adding-disk-space-to-linux-vm-in-vmware.html). I tried this out and it worked great.
I also had to do something similar in Windows, which turns out to be much simpler by using the VMWare Converter. Unfortunately this is not supported for Linux. The one thing that got me thinking though is that Windows can increase from a single drive and not have to use a separate drive. So why could I not do this in Linux?
The reason I needed to do this was for the new version of TPM (7.1). I originally had my VM set up with 20GB allocated, but the new version now requires approximately 50Gb to install, so the steps below are what I used to increase the LVM for my TPM install.
Here is my setup:
VM Ware: VMWare Server 2.0.0
Host OS: Windows 2003 SE SP2 x64
Guest OS: Red Hat ES4 U5
Increase VM Disk Size
Use the VMWare tool vmware-vdiskmanager.exe to increase the size
C:\Program Files (x86)\VMware\VMware Server>vmware-vdiskmanager.exe -x 50GB "f:\
VM_Images\VM TPM7.1 RH\rhes4srv01\Red Hat Enterprise Linux 4.vmdk"
Disk expansion completed successfully.
Use fdisk to create new partition
Even though the previous step reports that more disk was added, it still is not recognized by the OS.
Current file system:
df
Filesystem 1K-blocks Used Available Use% Mounted on
/dev/mapper/VolGroup00-LogVol00 19448516 1964128 16496436 11% /
/dev/sda1 101086 13232 82635 14% /boot
none 257208 0 257208 0% /dev/shm
1. Enter the FDISK utility
fdisk /dev/sda
2. Print the existing partition table
Command (m for help): p
Disk /dev/sda: 53.6 GB, 53687091200 bytes
255 heads, 63 sectors/track, 6527 cylinders
Units = cylinders of 16065 * 512 = 8225280 bytes
Device Boot Start End Blocks Id System
/dev/sda1 * 1 13 104391 83 Linux
/dev/sda2 14 2610 20860402+ 8e Linux LVM
3. Create new partition. This will be a Primary partition and is the 3rd partition. For the cylimder values, press enter to accept the defaults
Command (m for help): n
Command action
e extended
p primary partition (1-4)
p
Partition number (1-4): 3
First cylinder (2611-6527, default 2611):
Using default value 2611
Last cylinder or +size or +sizeM or +sizeK (2611-6527, default 6527):
Using default value 6527
4. Set the Partition type to Linux LVM (hex 8e)
Command (m for help): t
Partition number (1-4): 3
Hex code (type L to list codes): 8e
Changed system type of partition 3 to 8e (Linux LVM)
5. Print the Partition table again to see the new partition
Command (m for help): p
Disk /dev/sda: 53.6 GB, 53687091200 bytes
255 heads, 63 sectors/track, 6527 cylinders
Units = cylinders of 16065 * 512 = 8225280 bytes
Device Boot Start End Blocks Id System
/dev/sda1 * 1 13 104391 83 Linux
/dev/sda2 14 2610 20860402+ 8e Linux LVM
/dev/sda3 2611 6527 31463302+ 8e Linux LVM
6. Write the new partition information
Command (m for help): w
The partition table has been altered!
Calling ioctl() to re-read partition table.
WARNING: Re-reading the partition table failed with error 16: Device or resource busy.
The kernel still uses the old table.
The new table will be used at the next reboot.
Syncing disks.
7. Reboot
Create the Logical Volume
Now that the partition is created, the physical and logical volume needs to be created
1. Create the Physical Volume - use the new partition information from the df command. In this case the new partition is /dev/sda3
pvcreate /dev/sda3
Physical volume "/dev/sda3" successfully created
2. Add the new Physical Volume to the Logical Volume
vgextend VolGroup00 /dev/sda3
Volume group "VolGroup00" successfully extended
3. Extend the Logical Volume.
vgdisplay
--- Volume group ---
VG Name VolGroup00
System ID
Format lvm2
Metadata Areas 2
Metadata Sequence No 4
VG Access read/write
VG Status resizable
MAX LV 0
Cur LV 2
Open LV 2
Max PV 0
Cur PV 2
Act PV 2
VG Size 49.88 GB
PE Size 32.00 MB
Total PE 1596
Alloc PE / Size 635 / 19.84 GB
Free PE / Size 961 / 30.03 GB
VG UUID bzOq45-o5yO-ruYY-Ffx1-DxCx-2e2j-ardXtu
lvextend -L +30.03G /dev/VolGroup00/LogVol00
Rounding up size to full physical extent 30.03 GB
Extending logical volume LogVol00 to 48.88 GB
Logical volume LogVol00 successfully resized
Note: The lvextend can either use the value of the Free PE from the vgdisplay command or the command lvextend -l +100%FREE /dev/VolGroup00/LogVol00. I found out about the %FREE after, so I did not test this.
4. Extend the filesystem
The resize2fs does not work for this situation. The command ext2online will allow for the disk to be resized while disk is still mounted.
ext2online /dev/VolGroup00/LogVol00
5. View the new file system
df
Filesystem 1K-blocks Used Available Use% Mounted on
/dev/mapper/VolGroup00-LogVol00 50444996 1972848 45911716 5% /
/dev/sda1 101086 13232 82635 14% /boot
none 1825828 0 1825828 0% /dev/shm
And there is a system with a nice large drive. Hope this helps you.
Monday, January 26, 2009
Friday, January 16, 2009
TPM 7.1 Notes
After checking out TPM 7.1 for a little while, I thought I would post some of my observations on this new version.
Downloads
Get ready for another big download. To download the media for Windows, it was approximately 15GB. I also downloaded the Linux media, but really they do share a bunch between the various OS installs, so this was only another 5GB. The IBM document for downloading is located at http://www-01.ibm.com/support/docview.wss?uid=swg24020532
Installation
For now, I have only done the Windows based install as I was more interested in the actual product usage rather than fighting with an install at this time. Little did I know that the install would be a bit of a fight.
I decided to go with the default install for now just to get it up and running. So I brought up my trusty Windows 2003 SP2 VM image and started to prep it for the installation. Since the disk requirements were more than I allocated to my C drive, I created a new drive and allocated 50GB for an E drive. I then extracted the images to the E drive and started installing. After a few pages of entering information, I started to get failures. After checking around and asking IBM support, it turns out the default install is only supported on one volume (this is in the documentation, but not really clear as I was installing everything on one “volume”, the E drive). So I had to increase the C drive space (thanks to VMware Converter) and start again. After that the install went fine. It took about 5 hours to complete.
Start Up
Starting TPM is not much different than it was in the 5.x versions. There is a nice little icon to start and stop TPM. The only issue I had is that the TDS (Tivoli Directory Server) does not start automatically. This means that you cannot log in! You have to manually start the TDS service. I am sure that this has something to do with startup prereqs, but have not investigated right now.
New User Interface
Because I have used TSRM (Tivoli Service Request Manager), the interface was not that foreign to me, but still way different than the 5.x interface. I find that it is not as fluid as the old interface but is way more powerful and flexible. With a proper layout, I am sure that it can be way easier to navigate than 5.x.
One thing that does bug me is that Internet Explorer is the only supported browser. I have been using Firefox and everything seems to work fine except for the reports (could be just my setup)
The new interface has tabs which are called Start Center Templates. These start Centers can be setup to provide shortcuts into the application that are specific to the function of the user. So if you have someone that is an inventory specialist, you can create a layout that will provide quick access to everything they need to perform their job rather than displaying what they do not need like workflows and security. A user/group can also be assigned multiple Start Center templates. This is useful for using existing templates created for various job functions and providing them to a user whose role spreads multiple areas.
 Start Center - Default Provisioning Administrator
Discovery
There is something new called a Discovery Wizard. These wizards can perform multiple functions for discovery rather than the one step discovery (RXA discovery or inventory). For example, one wizard is called Computer Discovery, Common Agent Installation and Inventory Discovery. This discovery does exactly what it says. The first step will be to discover the computer using the RXA discovery, then once that is completed, install the TCA on the discovered systems, and then do an inventory scan of the systems. Worked pretty nice. The only issue I had is that the default setting for the TCA is to enable the SDI-SAP. This means that in order to perform the inventory scan, the SDI environment needs to be configured first. Either that, or change the global variable TCA.Create.EO.SAP to false.
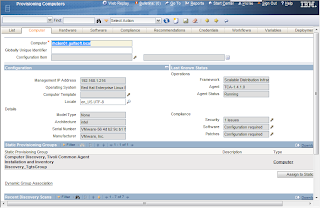
Computer General Information
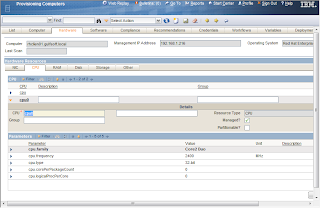
Computer Hardware Information (CPU)
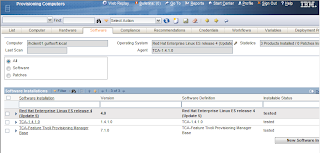
Computer Software Information
Reporting
Reporting for 7.1 is WAY different than 5.x. TPM now uses BIRT to provide reporting instead of the DB2 Alphablox. Now there is good and bad with this new reporting method. The bad thing is that it is quite a bit more complex than the 5.x reports. The 5.x was pretty simple to use and create a report. The good thing is that BIRT is quite a bit more flexible and is being standardized across the various Tivoli products (Tivoli Common Reporting is BIRT with WebSphere) so the experience from one product can be shared across all.
Another note is that reports are no longer used for the dynamic groups. Dynamic groups use something called a query (I think I will follow-up on this in a future blog).
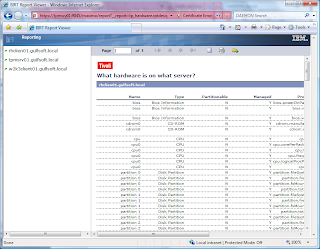
Sample Report – What Hardware is installed on what server
General Comments
The new version of TPM is looking very promising. The interface is very flexible/customizable, which is something that the old interface was not. The old interface did seem to flow a bit better by allowing the opening of new windows and tabs by right clicking on an object. This is not something that can be done in the new interface. The old one was specifically designed for the job it had to do, but really could not do much more, where the new interface will allow for the ability to expand beyond just TPM functions. This new interface is the same one shared by TSRM, TAMIT, TADDM and many other Maximo products.
Now we just need to see what will happen with the new version of TPMfSW (possibly named TDM or Tivoli Desktop Manager) to see what the full direction will be. One other thing that I know is on the list is the new TCA. This was something that I was hoping would be squeaked in (it was not promised for this release) but hopefully the 7.1.1 release will.
If you have any comments or questions, please fire them off and I will see what I can do to answer them.
Downloads
Get ready for another big download. To download the media for Windows, it was approximately 15GB. I also downloaded the Linux media, but really they do share a bunch between the various OS installs, so this was only another 5GB. The IBM document for downloading is located at http://www-01.ibm.com/support/docview.wss?uid=swg24020532
Installation
For now, I have only done the Windows based install as I was more interested in the actual product usage rather than fighting with an install at this time. Little did I know that the install would be a bit of a fight.
I decided to go with the default install for now just to get it up and running. So I brought up my trusty Windows 2003 SP2 VM image and started to prep it for the installation. Since the disk requirements were more than I allocated to my C drive, I created a new drive and allocated 50GB for an E drive. I then extracted the images to the E drive and started installing. After a few pages of entering information, I started to get failures. After checking around and asking IBM support, it turns out the default install is only supported on one volume (this is in the documentation, but not really clear as I was installing everything on one “volume”, the E drive). So I had to increase the C drive space (thanks to VMware Converter) and start again. After that the install went fine. It took about 5 hours to complete.
Start Up
Starting TPM is not much different than it was in the 5.x versions. There is a nice little icon to start and stop TPM. The only issue I had is that the TDS (Tivoli Directory Server) does not start automatically. This means that you cannot log in! You have to manually start the TDS service. I am sure that this has something to do with startup prereqs, but have not investigated right now.
New User Interface
Because I have used TSRM (Tivoli Service Request Manager), the interface was not that foreign to me, but still way different than the 5.x interface. I find that it is not as fluid as the old interface but is way more powerful and flexible. With a proper layout, I am sure that it can be way easier to navigate than 5.x.
One thing that does bug me is that Internet Explorer is the only supported browser. I have been using Firefox and everything seems to work fine except for the reports (could be just my setup)
The new interface has tabs which are called Start Center Templates. These start Centers can be setup to provide shortcuts into the application that are specific to the function of the user. So if you have someone that is an inventory specialist, you can create a layout that will provide quick access to everything they need to perform their job rather than displaying what they do not need like workflows and security. A user/group can also be assigned multiple Start Center templates. This is useful for using existing templates created for various job functions and providing them to a user whose role spreads multiple areas.
 Start Center - Default Provisioning Administrator
Discovery
There is something new called a Discovery Wizard. These wizards can perform multiple functions for discovery rather than the one step discovery (RXA discovery or inventory). For example, one wizard is called Computer Discovery, Common Agent Installation and Inventory Discovery. This discovery does exactly what it says. The first step will be to discover the computer using the RXA discovery, then once that is completed, install the TCA on the discovered systems, and then do an inventory scan of the systems. Worked pretty nice. The only issue I had is that the default setting for the TCA is to enable the SDI-SAP. This means that in order to perform the inventory scan, the SDI environment needs to be configured first. Either that, or change the global variable TCA.Create.EO.SAP to false.


Reporting
Reporting for 7.1 is WAY different than 5.x. TPM now uses BIRT to provide reporting instead of the DB2 Alphablox. Now there is good and bad with this new reporting method. The bad thing is that it is quite a bit more complex than the 5.x reports. The 5.x was pretty simple to use and create a report. The good thing is that BIRT is quite a bit more flexible and is being standardized across the various Tivoli products (Tivoli Common Reporting is BIRT with WebSphere) so the experience from one product can be shared across all.
Another note is that reports are no longer used for the dynamic groups. Dynamic groups use something called a query (I think I will follow-up on this in a future blog).

General Comments
The new version of TPM is looking very promising. The interface is very flexible/customizable, which is something that the old interface was not. The old interface did seem to flow a bit better by allowing the opening of new windows and tabs by right clicking on an object. This is not something that can be done in the new interface. The old one was specifically designed for the job it had to do, but really could not do much more, where the new interface will allow for the ability to expand beyond just TPM functions. This new interface is the same one shared by TSRM, TAMIT, TADDM and many other Maximo products.
Now we just need to see what will happen with the new version of TPMfSW (possibly named TDM or Tivoli Desktop Manager) to see what the full direction will be. One other thing that I know is on the list is the new TCA. This was something that I was hoping would be squeaked in (it was not promised for this release) but hopefully the 7.1.1 release will.
If you have any comments or questions, please fire them off and I will see what I can do to answer them.
Wednesday, January 14, 2009
Migrating endpoints to a new TMR
This question keeps coming up in the TME10 list so I thought I would go through a couple methods that I have used. You can determine which one you want to use for your environment.
Note: This is mainly looking from a Windows endpoint perspective, but easy enough to apply to any OS.
Using wadminep
By making use of the wadminep command, you can issue a sequence of commands to delete the lcf.dat file and restart the endpoint with new configuration settings. The two arguments to use are remove_file and reexec_lcfd. These can be wrapped in a script (sh, perl) and executed against one or many targets. This method is easiest to implement, but is probably slower as it processes on endpoint at a time.
The basic steps are
wadminep remove_file lcf.dat
wadminep reexec_lcfd -g "<gateway_name>+<gateway_port>"
You can either hard code the gateway name and port, or make these variables.
Using a software package
It is possible to create a software package that can be distributed to the targets to perform the same basic functions of the wadminep commands. The good thing with the software distribution method is that you can hit more targets at the same time and also use the MDIST2 features to help with the distribution (result info, timeouts, bandwidth, etc).
The only issue with using a software package is that you cannot just run a script that stops and starts the endpoint. If you run a script that stops the endpoint, it will also stop the script from executing and it will result in either an interrupted or failed state. To work around this issue, the package will need to execute a script that will spawn a new script and release. Since the spawned script will execute right away, a delay is needed, which is where the sleep command comes in handy.
This package will consist of 2 batch files and the sleep command. The sleep command may need to be included as this is not available on all Windows systems.
Batch File 1 - start_mig_ep.bat
This script will remove the old dat file from the endpoint and then spawn the restart_ep.bat script
=====================================================================
@echo off
call "%SYSTEMROOT%\Tivoli\lcf\1\lcf_env.cmd"
REM Create backup directory in case the endpoitn needs to be moved back to the old TMR
if not exist "%LCF_DATDIR%\mig_bak" mkdir "%LCF_DATDIR%\mig_bak"
REM move the LCF files
if exist "%LCF_DATDIR%\lcf.dat" move /y "%LCF_DATDIR%\lcf.dat" "%LCF_DATDIR%\mig_bak\lcf.dat"
if exist "%LCF_DATDIR%\lcfd.log" move /y "%LCF_DATDIR%\lcfd.log" "%LCF_DATDIR%\mig_bak\lcfd.log"
REM Delete the bak/bk files. In some newer versions of endpoint, these files are created
del /f/q "%LCF_DATDIR%\*.bk"
del /f/q "%LCF_DATDIR%\*.bak"
start "Restart EP" "$(target_dir)\restart_ep.bat"
=====================================================================
Batch File 2 - restart_ep.bat
This file will use sleep to give some time for the endpoint to report that it is completed and then continue with the endpoint restart. When the endpoint is restarted, the gateway parameter will be passed with a gateway from the new TMR.
=====================================================================
@echo off
echo setting sleep for 30 seconds > "$(target_dir)\restart_ep.log"
call "$(target_dir)\sleep" 30 >> "$(target_dir)\restart_ep.log"
REM Stop the lcfd
call net stop lcfd >> "$(target_dir)\restart_ep.log"
REM Start the lcfd
call net start lcfd "/g$(gw_name)+9494" "/d3" >> "$(target_dir)\restart_ep.log"
=====================================================================
Once the scripts are created, the software package can be created to send the files to the target and then execute the start_mig_ep.bat script. Some notes on the software package that will be required:
1. Variables will be required for the scripts
- target_dir: used as the destination for where the files will be sent and the script executed from. I have set this to be a subdirectory of the Tivoli endpoint install location. This is done using the environment variable LCF_DATDIR (case sensitive if on UNIX). The value I used is $(LCF_DATDIR)\..\..\..\temp (if installed in C:\Tivoli\lcf\dat\1, this would be C:\Tivoli\temp)
- gw_name: used to define the gateway to be used in the distribution. This will allow for different distributions to be sent to different gateways. This could be the ip address, short name or FQDN.
2. Use of the substitute variables. Each of the scripts have the Tivoli variables in them. In order for the scripts to be updated, the Substitute Variables checkbox needs to be checked. This is in the advanced file properties for the files.
Migrate_ep SPD file contents
=====================================================================
"TIVOLI Software Package v4.2.3 - SPDF"
package
name = migrate_ep
title = "No title"
version = 1.0
web_view_mode = hidden
undoable = o
committable = o
history_reset = n
save_default_variables = n
creation_time = "2009-01-14 10:00:00"
last_modification_time = "2009-01-14 10:00:00"
default_variables
target_dir = $(LCF_DATDIR)\..\..\..\temp
gw_name = gateway_name
end
log_object_list
location = $(target_dir)
unix_user_id = 0
unix_group_id = 0
unix_attributes = rwx,rx,
end
move_removing_host = y
no_check_source_host = y
lenient_distribution = y
default_operation = install
server_mode = all,force
operation_mode = not_transactional
post_notice = n
before_as_uid = 0
skip_non_zero = n
after_as_uid = 0
no_chk_on_rm = y
versioning_type = swd
package_type = refresh
sharing_control = none
stop_on_failure = y
add_directory
stop_on_failure = y
add = y
replace_if_existing = y
replace_if_newer = n
remove_if_modified = n
location = C:\CID\SRC
name = migrate_ep
translate = n
destination = $(target_dir)
descend_dirs = n
remove_empty_dirs = y
is_shared = n
remove_extraneous = n
substitute_variables = y
unix_owner = root
unix_user_id = 0
unix_group_id = 0
preserve_unix = n
create_dirs = y
remote = n
compute_crc = n
verify_crc = n
delta_compressible = d
temporary = n
is_signature = n
compression_method = deflated
rename_if_locked = y
add_file
replace_if_existing = y
replace_if_newer = n
remove_if_modified = n
name = sleep.exe
translate = n
destination = sleep.exe
remove_empty_dirs = y
is_shared = n
remove_extraneous = n
substitute_variables = y
unix_owner = root
unix_user_id = 0
unix_group_id = 0
preserve_unix = n
create_dirs = y
remote = n
compute_crc = n
verify_crc = n
delta_compressible = d
temporary = n
is_signature = n
compression_method = deflated
rename_if_locked = y
end
add_file
replace_if_existing = y
replace_if_newer = n
remove_if_modified = n
name = restart_ep.bat
translate = n
destination = restart_ep.bat
remove_empty_dirs = y
is_shared = n
remove_extraneous = n
substitute_variables = y
unix_owner = root
unix_user_id = 0
unix_group_id = 0
preserve_unix = n
create_dirs = y
remote = n
compute_crc = n
verify_crc = n
delta_compressible = d
temporary = n
is_signature = n
compression_method = deflated
rename_if_locked = y
end
add_file
replace_if_existing = y
replace_if_newer = n
remove_if_modified = n
name = start_mig_ep.bat
translate = n
destination = start_mig_ep.bat
remove_empty_dirs = y
is_shared = n
remove_extraneous = n
substitute_variables = y
unix_owner = root
unix_user_id = 0
unix_group_id = 0
preserve_unix = n
create_dirs = y
remote = n
compute_crc = n
verify_crc = n
delta_compressible = d
temporary = n
is_signature = n
compression_method = deflated
rename_if_locked = y
end
end
execute_user_program
caption = "Execute migrate batch file"
transactional = n
during_install
path = $(target_dir)\start_mig_ep.bat
inhibit_parsing = n
timeout = 300
unix_user_id = 0
unix_group_id = 0
user_input_required = n
output_file = $(target_dir)\start_mig_ep_out.log
error_file = $(target_dir)\start_mig_ep_err.log
output_file_append = n
error_file_append = n
reporting_stdout_on_server = n
reporting_stderr_on_server = n
max_stdout_size = 10000
max_stderr_size = 10000
bootable = n
retry = 1
exit_codes
success = 0,0
failure = 1,65535
end
end
end
end
=====================================================================
Note: This is mainly looking from a Windows endpoint perspective, but easy enough to apply to any OS.
Using wadminep
By making use of the wadminep command, you can issue a sequence of commands to delete the lcf.dat file and restart the endpoint with new configuration settings. The two arguments to use are remove_file and reexec_lcfd. These can be wrapped in a script (sh, perl) and executed against one or many targets. This method is easiest to implement, but is probably slower as it processes on endpoint at a time.
The basic steps are
wadminep
wadminep
You can either hard code the gateway name and port, or make these variables.
Using a software package
It is possible to create a software package that can be distributed to the targets to perform the same basic functions of the wadminep commands. The good thing with the software distribution method is that you can hit more targets at the same time and also use the MDIST2 features to help with the distribution (result info, timeouts, bandwidth, etc).
The only issue with using a software package is that you cannot just run a script that stops and starts the endpoint. If you run a script that stops the endpoint, it will also stop the script from executing and it will result in either an interrupted or failed state. To work around this issue, the package will need to execute a script that will spawn a new script and release. Since the spawned script will execute right away, a delay is needed, which is where the sleep command comes in handy.
This package will consist of 2 batch files and the sleep command. The sleep command may need to be included as this is not available on all Windows systems.
Batch File 1 - start_mig_ep.bat
This script will remove the old dat file from the endpoint and then spawn the restart_ep.bat script
=====================================================================
@echo off
call "%SYSTEMROOT%\Tivoli\lcf\1\lcf_env.cmd"
REM Create backup directory in case the endpoitn needs to be moved back to the old TMR
if not exist "%LCF_DATDIR%\mig_bak" mkdir "%LCF_DATDIR%\mig_bak"
REM move the LCF files
if exist "%LCF_DATDIR%\lcf.dat" move /y "%LCF_DATDIR%\lcf.dat" "%LCF_DATDIR%\mig_bak\lcf.dat"
if exist "%LCF_DATDIR%\lcfd.log" move /y "%LCF_DATDIR%\lcfd.log" "%LCF_DATDIR%\mig_bak\lcfd.log"
REM Delete the bak/bk files. In some newer versions of endpoint, these files are created
del /f/q "%LCF_DATDIR%\*.bk"
del /f/q "%LCF_DATDIR%\*.bak"
start "Restart EP" "$(target_dir)\restart_ep.bat"
=====================================================================
Batch File 2 - restart_ep.bat
This file will use sleep to give some time for the endpoint to report that it is completed and then continue with the endpoint restart. When the endpoint is restarted, the gateway parameter will be passed with a gateway from the new TMR.
=====================================================================
@echo off
echo setting sleep for 30 seconds > "$(target_dir)\restart_ep.log"
call "$(target_dir)\sleep" 30 >> "$(target_dir)\restart_ep.log"
REM Stop the lcfd
call net stop lcfd >> "$(target_dir)\restart_ep.log"
REM Start the lcfd
call net start lcfd "/g$(gw_name)+9494" "/d3" >> "$(target_dir)\restart_ep.log"
=====================================================================
Once the scripts are created, the software package can be created to send the files to the target and then execute the start_mig_ep.bat script. Some notes on the software package that will be required:
1. Variables will be required for the scripts
- target_dir: used as the destination for where the files will be sent and the script executed from. I have set this to be a subdirectory of the Tivoli endpoint install location. This is done using the environment variable LCF_DATDIR (case sensitive if on UNIX). The value I used is $(LCF_DATDIR)\..\..\..\temp (if installed in C:\Tivoli\lcf\dat\1, this would be C:\Tivoli\temp)
- gw_name: used to define the gateway to be used in the distribution. This will allow for different distributions to be sent to different gateways. This could be the ip address, short name or FQDN.
2. Use of the substitute variables. Each of the scripts have the Tivoli variables in them. In order for the scripts to be updated, the Substitute Variables checkbox needs to be checked. This is in the advanced file properties for the files.
Migrate_ep SPD file contents
=====================================================================
"TIVOLI Software Package v4.2.3 - SPDF"
package
name = migrate_ep
title = "No title"
version = 1.0
web_view_mode = hidden
undoable = o
committable = o
history_reset = n
save_default_variables = n
creation_time = "2009-01-14 10:00:00"
last_modification_time = "2009-01-14 10:00:00"
default_variables
target_dir = $(LCF_DATDIR)\..\..\..\temp
gw_name = gateway_name
end
log_object_list
location = $(target_dir)
unix_user_id = 0
unix_group_id = 0
unix_attributes = rwx,rx,
end
move_removing_host = y
no_check_source_host = y
lenient_distribution = y
default_operation = install
server_mode = all,force
operation_mode = not_transactional
post_notice = n
before_as_uid = 0
skip_non_zero = n
after_as_uid = 0
no_chk_on_rm = y
versioning_type = swd
package_type = refresh
sharing_control = none
stop_on_failure = y
add_directory
stop_on_failure = y
add = y
replace_if_existing = y
replace_if_newer = n
remove_if_modified = n
location = C:\CID\SRC
name = migrate_ep
translate = n
destination = $(target_dir)
descend_dirs = n
remove_empty_dirs = y
is_shared = n
remove_extraneous = n
substitute_variables = y
unix_owner = root
unix_user_id = 0
unix_group_id = 0
preserve_unix = n
create_dirs = y
remote = n
compute_crc = n
verify_crc = n
delta_compressible = d
temporary = n
is_signature = n
compression_method = deflated
rename_if_locked = y
add_file
replace_if_existing = y
replace_if_newer = n
remove_if_modified = n
name = sleep.exe
translate = n
destination = sleep.exe
remove_empty_dirs = y
is_shared = n
remove_extraneous = n
substitute_variables = y
unix_owner = root
unix_user_id = 0
unix_group_id = 0
preserve_unix = n
create_dirs = y
remote = n
compute_crc = n
verify_crc = n
delta_compressible = d
temporary = n
is_signature = n
compression_method = deflated
rename_if_locked = y
end
add_file
replace_if_existing = y
replace_if_newer = n
remove_if_modified = n
name = restart_ep.bat
translate = n
destination = restart_ep.bat
remove_empty_dirs = y
is_shared = n
remove_extraneous = n
substitute_variables = y
unix_owner = root
unix_user_id = 0
unix_group_id = 0
preserve_unix = n
create_dirs = y
remote = n
compute_crc = n
verify_crc = n
delta_compressible = d
temporary = n
is_signature = n
compression_method = deflated
rename_if_locked = y
end
add_file
replace_if_existing = y
replace_if_newer = n
remove_if_modified = n
name = start_mig_ep.bat
translate = n
destination = start_mig_ep.bat
remove_empty_dirs = y
is_shared = n
remove_extraneous = n
substitute_variables = y
unix_owner = root
unix_user_id = 0
unix_group_id = 0
preserve_unix = n
create_dirs = y
remote = n
compute_crc = n
verify_crc = n
delta_compressible = d
temporary = n
is_signature = n
compression_method = deflated
rename_if_locked = y
end
end
execute_user_program
caption = "Execute migrate batch file"
transactional = n
during_install
path = $(target_dir)\start_mig_ep.bat
inhibit_parsing = n
timeout = 300
unix_user_id = 0
unix_group_id = 0
user_input_required = n
output_file = $(target_dir)\start_mig_ep_out.log
error_file = $(target_dir)\start_mig_ep_err.log
output_file_append = n
error_file_append = n
reporting_stdout_on_server = n
reporting_stderr_on_server = n
max_stdout_size = 10000
max_stderr_size = 10000
bootable = n
retry = 1
exit_codes
success = 0,0
failure = 1,65535
end
end
end
end
=====================================================================
Thursday, January 8, 2009
System Downtime Monitoring Using Universal Agent
ITM provides system uptime monitoring out-of-the box. You just have to select the uptime attribute and you can use the attribute in situation formula. It is that simple. Okay, what if you want to monitor the system downtime? It may sound like little difficult but with Universal Agent it is possible to guage this value with a simple MDL and script combination. This article explains how to do it. It also provides an example how to use some of the Time functions of UA.
How does it work?
To calculate downtime, we need to write a simple script that outputs the current date and time and the previous value of the date and time. We use the UA to get the capture these values. So, how do we get the previous value? UA provides this feature out-of-the box and it is documented! Just use the environment variable $PREV_VALUE in your script. Unfortunately this value is not persistent across UA restarts, so your script should store the last time it ran in a file somewhere. You can also use the UA functions to convert the script output to ITM timestamp. So after this, you will get Current Time, the previous time the script ran as attributes in the portal. You can write a simple situation that uses Time Delta function to calculate the difference between the two times and alert.
MDL
A Simple MDL listing is given below. It is given as an example only. Perform your own testing to ensure its working.
//APPL V02_SYSTEM_DOWNTIME
//NAME DOWNTIME K 300 AddTimeStamp Interval=60
//SOURCE SCRIPT /opt/gbs/bin/downtime.sh
//ATTRIBUTES
Hostname (GetEnvValue = HOSTNAME)
CurrentDate D 10
CurrentTime D 10
PrevDate D 10
PrevTime D 10
CurrentDateTime (CurrentDate + CurrentTime)
PrevDateTime (PrevDate + PrevTime)
CurrentTimeStamp (TivoliTimeStamp = CurrentDateTime)
PrevTimeStamp (TivoliTimestamp = PrevDateTime)
Script
Here is a sample shell script that retrieves current and prev time stamp values.
#!/bin/sh
# Latest Timestamp
current_value=`date "+%m/%d/%Y %H:%M:%S"`
# If the PREV_VALUE exists, displays current and prev values,
# else retrieve PREV_VALUE from persistent file
if [ "x$PREV_VALUE" != 'x' ]
then
echo $current_value $PREV_VALUE
else
prev_value=`cat /tmp/downtime.txt`
echo $current_value $prev_value
fi
# finally, store the current timestamp in persistent file
echo $current_value > /tmp/downtime.txt
Drawbacks
Does this solution provide accurate downtime estimate? No, it doesn't. For example you may get potential false alerts if the UA goes down for some reason. Also, it provides the time difference between the script last ran and script's latest run not exactly the time between system reboots. But these are minor drawbacks to live with!
Questions, comments? Please feel free to post them.
Subscribe to:
Posts (Atom)