General Comments We have been hearing about this product since Pulse 2008. The idea was to target a product on the desktop segment rather than one the covers both the server and desktop markets. This was done as these are two different worlds when it comes to management. IBM was hearing from customers that they wanted a more hands-off approach to dealing with desktops, in other words “set and forget” (my term I just made up, so don’t blame IBM for this possible bad phrasing). This was also what other vendors have been doing in the desktop market.
I have been involved with the beta of this product since it was available and will cover a few components of the product.
During the beta, this product was known as DTM. At release, it was renamed to Tivoli Policy Driven Software Distribution (TPDSD), which at least let you know that it was policy driven, but seemed to state that it only did software distribution, which it does, but also does more. It looks like this could be renamed in the next release to Tivoli Endpoint Manager (TEM). Which may seem to be a better name to some, it is actually really confusing to others that have been involved with Framework as this was the name of the component that responsible for managing information regarding the endpoints. For the purposes of this blog, I will use the current name of TPDSD. Who knows, maybe it will change again before TEM comes out ;)
Operating System Support With the first release of TPDSD, there is very limited support for just Windows on both the server and target. The server can run on Windows 2003 and 2008 on 32 or 64 bit. The agents are supported on Windows XP, Vista, 2003 (32/64), 2008 (32/64).
The next release is supposed to have more support for both the servers and agents. There is even talk of MacOS support.
Agent Communications In TPMfSW you were able to handle tasks to the targets using either RXA or the TCA. TPDSD only uses the agents for these tasks and the only time RXA is used is for the remote agent installation.
The great news is that the agent is now natively compiled, so no more JRE! The new agent is approx 30MB and that is the core agent and all other required support files.
Like TPMfSW, the agent also has various polling intervals. There are intervals for: 1. Checking local cached policies 2. Checking for new policies 3. Sending reports
All of these variables can be set at installation time or by an agent configuration policy.
What is a Policy? The policies within TPDSD are what are used to do anything to an agent. If you want to install a piece of software, that is a policy. Scan the system, another policy. Configure the agent, you guessed it, a policy. When a policy is created, it is assigned to a target or a group of targets and will stay with that target until it is withdrawn or the machine is rebuilt.
Policies can be setup to either require or prohibit software from being installed. In order to require software to be installed, you need to first define the software to TPDSD and then define how the software is to be recognized on the target. For the recognition of software, there quite a few different ways that can be used to define how to detect software on a target. 1. If it is an MSI, you can define the GUID as the key. When importing an MSI, this is done automatically 2. If using a SPB, the state code is used when importing. This would take the name and version of the SPB and verify that it is in a successful install state on the target (IC--- for those familiar with TCM) 3. File existence – check for a specific file in a directory 4. Registry existence – check for a specific registry key
There are 35 different checks that can be done and multiple checks can be combined to determine if a product is installed or not. This can make the detection very flexible.
To prohibit software, you still need to create the software definition which would also define how to remove the software. The definition needs to exist so that the policy can be created and the uninstall instructions need to exist to actually do the removal.
Self Service Catalog The self service catalog is a web interface that can be used be the client system to request the installation of software. The catalog contains a searchable section and a “Popular Software” section. The “Popular Software” could be something like a core set of products or free software that is allowed to be installed. This interface also allows the end user to remove software that is currently installed.
When the user requests software from the catalog, it is submitted and a new policy is created for the software to the specific target. This means that the agent will keep checking if the software is installed even after the initial request is completed.
The “set and forget” is the policy part of the product. You set a policy for a target, or group of targets, to have or not have software and the product takes care of maintaining the state of the target.
Integration with TPMfOSD TPMfOSD is not included with TPDSD, but can be easily integrated using a couple global variables. It is very easy to include the TPDSD agent as a software module so that it will automatically be installed and connected with the TPDSD server. Once installed, the agent can be set to automatically install application or perform other configurations based on policies.
Conclusion This product is looking really good and I cannot wait for the next release. Right now, due to the limited OS support and a few other things, it is not really ready for the primetime, and I do not believe that IBM is even stating that it is. It is really close and the concepts will continue from this version to the next. The next version will include much more OS support and I have heard of many new (and cool, as in good) features that people have been saying are missing. I do believe that this is a way better solution that has been designed from the ground up for the distributed environment, unlike TPMfSW, which will good, really was designed more for a datacenter.
Shameless Plug Look for Gulf Breeze Software Partners at Pulse 2010. I will also be doing a presentation called “End to End computer management with Tivoli Policy Driven Software Distribution”. This session will be demoing the use of TPDSD along with TPMfOSD to perform a bare-metal install all the way to installing applications via polcy.
The TADDM GUI only shows you a subset of the information that's stored in the database. The rest of the information can be found by accessing the database directly or using the command line ($COLLATION_HOME/dist/sdk/bin/api.sh). If you use the command line, the easiest way to get information about an object is if you have its GUID, with:
api.sh find [--depth num] --guid THE_GUID
but you need to get the GUID first. It's actually easy - just drag and drop an icon from the GUI into Notepad, and what you'll see will be similar to:
If you are looking to monitor Tivoli Framework from ITM, the best way is to develop an Universal agent or agent builder to pull framework metrics using your custom script. Needless to say, Framework provides a vast array of commands that can easily be scripted to get you the metrics you needed.
If you are looking to monitor basic server components such as TMR, ManagedNode, epmgr and gateways and if you are at Framework 4.3.1 or later, you are in luck. You don't even need to develop an MDL. Framework 4.3.1 provides a new component called tmfmon that provides necessary MDLs and commands that can be readily imported into Universal agent.
You need to take a look at $BINDIR/../generic/tmfmon/README file on how to implement this solution.
These aren't clear or verbose at this point, but I wanted to get the info out to anyone who wants it:
TADDM 7.2 and CCMDB 7.2 are out now, and they seem to work just great.
The TADDM 7.1.1.5 -> 7.2 upgrade works amazingly well, tho it takes several hours if you have lots of data
Java 1.6_17 (the latest as of a couple of weeks ago) JRE doesn't work with the TADDM GUI. You need to use an older version (1.6_07 works like a champ).
New in TADDM 7.2 is an "explore" feature in a topology view. This lets you add additional relationships to a view. So you can right-click a machine and select "Explore", then select what relationships you want displayed, then you can select which other objects that are associated via those relationships will be displayed. Kinda nifty.
CCMDB 7.2 has a new CI topology view. This is a nice feature so you don't have to launch over to TADDM just to see topology info.
In CCMDB 7.2, the "Admin" workstation is no longer limited to just Windows - Linux is supported (so you can run the CCMDB Launchpad from a Linux machine).
If you have been using CSV/flat file as a persistent storage for your scripts, you should really checkout, SQLite. It gives you the power of RDBMS while without the complexity that comes with it. Any SQLite database you create is nothing but a file. It provides locking, transaction support, joins, etc. With ".dump" command, it can generate the SQL commands to reproduce the whole schema.
Did I mention, this database format is supported by ActivePerl, by default? You can use the standard Perl DBI module to manage this database.
Also, there is a CLI tool called sqlite3 (~500K) that lets you run all database manipulation and SQL commands. And, if it is good enough for Google Android and Apple Safari, chances are it should be robust enough for my needs.
Here is a simple Perl script to access this database from Perl.
#!/usr/bin/perl
use DBI;
my $dbh = DBI->connect('dbi:SQLite:dbname=sample.db',',');
$sql = qq{ CREATE TABLE MYCERT ( num int not null, name varchar(20) ); }; $dbh->do($sql); $sql = qq{ INSERT INTO MYCERT VALUES(1, 'ITM'); }; $dbh->do($sql); $sql = qq{ INSERT INTO MYCERT VALUES(2, 'Omnibus'); }; $dbh->do($sql);
If you are looking to develop custom monitoring solution in ITM, ITM gives you two options, viz. an eclipse GUI based Agent Builder tool or Universal Agent (UA). Which one would you choose? While the agent builder is shiny and easy to use, UA solution has its own advantages. Read on to know some of the pros and cons of each approach.
Agent Builder based solution makes sense for the following scenarios.
1) If you want to deploy something real quick and easy, then Agent Builder is a good candidate for your needs. Once you are familiar with the agent builder interface, you can create a custom monitoring agent literally in minutes. Moreover, there are not many typos/mistakes you can make with the Agent Builder's GUI based approach.
2) If you generally prefer GUI method over CLI methods, you will like Agent Builder more.
3) If you want to pull from data sources such as JDBC, WMI, NT Event Log, Service Control Manager, etc, then you should be build an agent builder agent with few clicks. UA will require lot of work as you may have write your own code to pull data from these data sources.
4) If you want to integrate the custom monitoring deployement with your current agent deployment methods, then obviously agent builder is the way to go. Deploying agent builder is very much the same as deploying any other agent.
Universal Agent based solution makes sense for the following scenarios.
1) If you want to minimize the number of agents you want to manage, then you are better of with UA. For example, if your requirement is to deploy 'n' custom monitoring solutions, typically agent builder would require 'n' agents, whereas in case of UA, one agent should be able to perform all 'n' monitoring activities.
2) Let me prefix this statement with a caveat. Check with your IBM representative for all licensing related information. Since one UA can handle multiple monitoring tasks, the licensing costs of UA based solution is typically lower than that of Agent Builder.
3) If you have been using UA for a long time, you can deploy the UA solution as quickly as an Agent Builder solution. More over, UA works pretty reliably.
4) If your monitoring requirements needs advanced summarization capabilities, then UA provides more advanced features than agent builder. Again, some of these tasks can be done using by modifying the itm_agent_toolkit.xml file, but it is just that the Agent Builder capabilities in this regard is not fully known yet.
Hope this information is helpful in your next custom monitor deployment.
BIRT provides a very tight integration with Java/Java Script for customizing your reports. Most of the time, you embed your JavaScript within your reports and you have to modify each of the reports if something need to be changed.
However, there is a better way especially for some frequently used functions. You can put them in a .js file and re-use them across your reports. Here is how to do it.
1. Create a set of Java Script functions (such as for logging, modifying your queries, etc) and put it in a file. (e.g. GbsFunctions.js)
2. Save the file under somewhere under your resource directory, which can be set using Window->Preferences->Report Design->Resource->Resource folder within Eclipse. (e.g. resourcedir/GBS/scripts/GbsFunctions.js).
3. Now add the following XML tag to your XML source of the reports. Make sure that the XML you add doesn't result in malformed XML. (e.g. add just before <data-sources> tag). <list-property name="includeScripts"> <property>GBS/scripts/GbsFunctions.js</property> </list-property>
4. Now, you can access the functions listed in GbsFunctions.js within BIRT.
If you plan to install ITNM 3.8 on AIX 6.1 as a non-root user and have it run as SUID root (as opposed to having the processes actually run as root, which is your other option after you go through the install), you will need to install at least GSKit 7.0.4.11.
The reason I'm posting this is that you may unwittingly encounter these issues:
1. If you've already installed an ITM 6.2.1 agent on your AIX, you've got GSKit installed, but it's the wrong version. The version included with ITM 6.2.1 is 7.0.3.18. This version will cause several of the ITNM processes to fail.
2. ITNM actually ships with the correct GSKit libraries, but it simply copies those libraries to your AIX machine underneath your ITNM install location. So you might think that you can just set your LIBPATH environment variable to use these GSKit libraries. HOWEVER, you would be wrong - when a process is running as SUID root on AIX, the ONLY directories it searches for necessary libraries are those that are HARD-CODED into the binary! You can see this library path for any binary with the command 'dump -Hv executable_file_name'.
3. If you choose to run ITNM as root (rather than SUID root), you won't have this problem because you can just set the LIBPATH environment variable appropriately.
Hope you read my previous articles on converting TDW Timestamps into "normal" timestamps in DB2 and in JavaScript (BIRT). Recently, I had to re-write this function in MySQL. In case you wonder, ITNM uses MySQL as the poll data collection database and again the same problem manifested.
The solution in MySQL is similar to that of DB2 based solution. Create a function in MySQL database and call that function in your SQL. But here is how to do it.
Bring up MySQL Administrator client and connect to the database in question.
Goto Catalogs in your left pane and select the appropriate database schema.
Goto Stored Procedure tab and click the "Create Stored Proc".
In the name field, give a Name for the function (e.g. TDW_TO_NORMAL_TS) and click "Create FUNCTION" button.
MySQL will create a skeleton function like below. CREATE FUNCTION `ncpolldata`.`TDW_TO_NORMAL_TS` () RETURNS INT BEGIN END
Replace the "CREATE FUNCTION" to look like below. CREATE FUNCTION `ncpolldata`.`TDW_TO_NORMAL_TS` (tdw_time bigint) RETURNS DATETIME DETERMINISTIC
Between the "BEGIN" and "END" blocks, paste the following code. BEGIN Declare normal_time datetime; Declare tdw_trunc bigint; Set tdw_trunc = substr(tdw_time,2,12); Set normal_time = DATE_FORMAT(tdw_trunc, '%y%m%d%H%i%s'); return(normal_time); END
That's it. Click on the "Execute SQL" button to save the newly created function.
Call the function in your SQL Statements like below. SELECT TDW_TO_NORMAL_TS(poll_time) from KNP_POLL_DATA_COLLECTION LIMIT 100
I was just trying to create a simple report in BIRT using a flat file and got this error when trying to preview the data:
A BIRT exception occurred. Plug-in Provider:Eclipse.org Plug-in Name:BIRT Data Engine Plug-in ID:org.eclipse.birt.data Version:2.2.2.r22x_v20071212 Error Code:odaconsumer.CannotPrepareStatement Error Message:Failed to prepare the following query for the data set type org.eclipse.datatools.connectivity.oda.flatfile.dataSet. [select "COLUMN_1", "COLUMN_2", "COLUMN_3" from mydata.txt : {}] Invalid table name:mydata.txt
The problem turns out to be the location of my stupid file. I had placed it in C:\ and BIRT apparently doesn't like that at all. So I moved the file to a folder named C:\deleteme, then updated my Data Source and Data Set, and then all was well.
The two large differences between SNMPv3 and SNMPv2 (or v1, for that matter), are that:
1. it supports authentication via userid and password., and 2. it supports encryption
v1 and v2 don't support either of these. Their only means of authentication is via a "community string", which is basically like a password, but since it's always transferred over the network in the clear, it's not considered very secure.
The WRT component of ITCAM for Transactions can identify a number of transactions that, when processed by the AMC component, will create Managed System names that WILL corrupt your EIB (and you can't delete them). To guard against this, you should create the following filters (in the Application Configuration Tool):
Basically, Managed Systems should only have characters that match this regular expression: [-A-Za-z0-9_:.] (that's a literal "period"). If a Managed System has characters NOT in that expression, then 'tacmd cleanms' will fail. 'gbscmd clearoffline' can be used, and it will succeed in at least submitting the request, but your TEMS will soon crash.
"Restore from a backup (the /opt/IBM/ITM/tables directory)" is the best option, but that's not always an option. These steps will remove ALL data in the TEMS, HOWEVER, you don't have to reinstall all of the application support; you need to re-apply it, but you don't need to reinstall it. Here are the steps that I went through with ITM 6.2.1 IF2 on 32-bit Red Hat:
1. stop the TEMS and all other agents on the box. 2. remove the /opt/IBM/ITM/tables/YOUR_TEMS_NAME directory 3. uninstall the TEMS component by running /opt/IBM/ITM/bin/uninstall.sh and only select the TEMS component. 4. run the install from the CD/DVD and choose to install the TEMS 5. The install will create a directory named /opt/IBM/ITM/todata. Rename this directory to "YOUR_TEMS_NAME". 6. run 'itmcmd -S -t YOUR_TEMS_NAME ms' to configure the TEMS 7. restart the TeMS and all other agents 8. open up the "Manage Tivoli Monitoring Services" and add all application support (it's all still installed; you just need to re-apply it to the TEMS)
IMO, the reinstall (or re-configure) should recreate the /opt/IBM/ITM/tables/YOUR_TEMS_NAME directory, but it doesn't (it creates the directory, but not the EIB files). So the whole trick is copying the "todata" folder.
If you are using TEPS Java Webstart client, does it matter which JRE TEPS uses? You should be able to bring up the portal using either one, but in my experience IBM JRE works better for TEPS. With Sun JRE version 1.6.0.11, you may encounter issues with popups. While the situation editor and other tools worked correctly, I had problem with deploying non-OS agents from portal. The popup prompting for agent selection didn't appear at all. I encountered similar issue with the Database agent configuration window. Switching to IBM JRE resolved the issue.
So, how do you switch to IBM JRE? Assuming you're using Windows XP, goto Control Panel->Java->Java Tab->Java Application Runtime Settings -> View. In the list of JREs, disable the Sun JREs and enable only IBM JRE. Can't find IBM JRE? You can add the IBM JRE, by clicking either Find or Add button.
The xLinux 64-bit libttapi.so file for Linux is not included with the ITCAMfWAS 6.1.0.4 data collector, so if you enable the TTAPI you'll get error messages about ttapi not found in java.library.path in your WebSphere SystemOut.log file. You can find this file buried a little deeply in the ITCAM for Transactions 7.1.0.2 Collector Agent installation image, however. It is buried in a file called sdk/examples/linux-64.tar.gz. Untar this file and you'll file lib/libttapi.so and lib/libkbb.so, both of which you'll need to copy to your DC/toolkit/lib/linux-ix64/ directory, then restart WebSphere.
One of the things that started to annoy me when using FireFox was that it seemed to only allow meI to do 6 downloads from a site at a time. I would click on 6 downloads and they would all start, but when I click the 7th link, it would sit there until one of the previous downloads completed.
So after some digging I found that this is actually quite simple.
1. In the address bar type about:config. This will list all the possible configuration options with FireFox. Be Careful! 2. In the filter type http.max 3. Double click on the network.http.max-persistent-connections-per-server. This will display the Enter Integer Value dialog box. 4. Set the value to whatever new value you want. 5. Press OK to set the value
FireFox does not need to be restarted for this value to be set.
I would not set this number too high as it could slow down the overall speed of the download. I set it to 10 as there were 10 files I needed to download and I did not want to wait for one to finish before I started the next. I just wanted to click and walk away and come back in an hour :)
If you need to deploy the SQL Server agents, one of the items prompted for is the SQL Server Version. Most of us know the SQL Server by the year it was released as in SQL Server 2000, 2005 or 2008, but it is not the version number. (Version 2000 of SQL Server would be a rock-solid SQL Server, wouldn't it? :)).
Here is how to identify the version. Connect to the database server in question using Query Analyzer or SQL Server Management Studio and run the following SQL.
SELECT SERVERPROPERTY('productversion')
The above query on SQL 2005 returned 9.00.3042.00 and your result may vary depending on the Service Pack level. Generally speaking, SQL Server 2000 is version 8.x, 2005 is version 9.x and 2008 is version 10.x.
I finally had a chance to try an install on RH 5 x64 since it is now supported in 4.3.1. I have done some installs on Windows and RH 4 i386 and had no issues, but the 64 bit threw a couple problems.
1. The setup_linux_intel.bin file did not handle x64. When you ran the script the message "OS not supported" would be displayed. To correct this problem look for the case statement "case `uname -m` in" under this there is not a check for a return of 64 bit. So I modified the case to look like:
case `uname -m` in *86) FRESH='setup_linux_intel.bin' ;; *64) FRESH='setup_linux_intel.bin' ;; *390*) FRESH='setup_linux_390.bin' ;; *) echo "OS not supported." exit 1 ;; esac
Once this was done, the installer would start.
2. With the setup_linux_intel.bin fixed I was now getting the message "The installer is unable to run in graphical mode. Try running the installer with the -console or -silent flag". I made sure I had all the prereqs according to the doc, but still nothing. So after some playing around, I found out that I was missing the libraries libXmu-1.0.2-5.i386.rpm and libXp-1.0.0-8.1.e15.i386.rpm. The 64bit versions were there but not the 32 bit.
Hopefully this saves someone some grief if they need to install on RH5 x64.
It happened to me and it could happen to you too! The first time Tivoli Portal Java Web Start Client is launched, it creates a desktop shortcut. When you use the shortcut for subsequent portal use, the TEPS Client "Unable to launch application" error.
The error may happen on systems where IBM Java is not installed as System JVM and the TEPS shortcut points to the javaws.exe under C:\Windows\System32 and NOT the one under C:\Program Files\IBM.
The simplest way to correct the issue is to create a new desktop shortcut manually to point to the javaws.exe under C:\Program Files\IBM\JAVA50\jre\bin. When you do that, Java Webstart will prompt you to select the application every time by bringing up "Application Cache Viewer".
To skip this step, simply copy the command line argument to the javaws.exe from old shortcut to the new shortcut. You can get the argument to javaws.exe by right clicking the old shortcut -> go to Properties->Target.
Here is an example SQL statement you can use in a query to pull real-time NT Logical Disk data from all of the agents that have been added to the "MYWIN" Managed System List:
SELECT ORIGINNODE,TIMESTAMP,INSTCNAME,PCUSED FROM KNT.WTLOGCLDSK AT ("HUB_ITMSERVER") WHERE SYSTEM.PARMA("NODELIST", "MYWIN",5 )
In this statement, "HUB_ITMSERVER" is the label (not the hostname) of the TEMS the agents are connected to, "MYWIN" is the MSL name, and the "5" is simply the length of the string "MYWIN".
To find other available table names, the easiest way is to look in the agent application support SQL files on the TEMS.
ITM Event Synchronization (aka SUF, Situation Update Forwarder, SitForwarder) with Omnibus is mainly straightforward, but there are a couple of things to look out for.
Setting the logLevel
The 3 available logging levels in C:\IBM\SitForwarder\etc\situpdate.conf are:
low med verbose
Where the Logfile is Created
The default log file is in the Omnibus log directory, HOWEVER, the tracing log file is in:
C:\tmp\itmsynch\logs
This is where you'll see more information if you increase the logging level - NOT in the default log.
What to Look for in the Log
If event updates are correctly being sent back to ITM (for example, when you acknowledge an ITM event from the AEL in Omnibus), the following is an example of what you should see in the log file (with logLevel=verbose):
2009.06.03 16:24:09.703-04:00 com.tivoli.candlenet.SituationUpdateForwarder formatEvent IBM Tivoli Monitoring TEC Synchronization netcoolserver.gulfsoft.com IP Entry, parm 1 = op=a,sn=NT_Invalid_Logon_Attempt,sh=webappprod,sv=itmserver.gulfsoft.com:,et=,di=SYSTEM
2009.06.03 16:24:09.703-04:00 com.tivoli.candlenet.SituationUpdateForwarder formatEvent IBM Tivoli Monitoring TEC Synchronization netcoolserver.gulfsoft.com IP Number of tokens is 6
2009.06.03 16:24:09.703-04:00 com.tivoli.candlenet.SituationUpdateForwarder formatEvent IBM Tivoli Monitoring TEC Synchronization netcoolserver.gulfsoft.com IP Display item token is SYSTEM
2009.06.03 16:24:09.703-04:00 com.tivoli.candlenet.SituationUpdateForwarder formatEvent IBM Tivoli Monitoring TEC Synchronization netcoolserver.gulfsoft.com IP SOAP string: sysadminxxxxxNT_Invalid_Logon_Attemptwebappprod
2009.06.03 16:24:09.703-04:00 com.tivoli.candlenet.SituationUpdateForwarder formatEvent IBM Tivoli Monitoring TEC Synchronization netcoolserver.gulfsoft.com IP Exit, return value = sysadminxxxxxNT_Invalid_Logon_Attemptwebappprod
2009.06.03 16:24:09.703-04:00 com.tivoli.candlenet.SituationUpdateForwarder getServerUrlConnection IBM Tivoli Monitoring TEC Synchronization netcoolserver.gulfsoft.com IP Entry, parm 1 = op=a,sn=NT_Invalid_Logon_Attempt,sh=webappprod,sv=itmserver.gulfsoft.com:,et=,di=SYSTEM
2009.06.03 16:24:09.703-04:00 com.tivoli.candlenet.SituationUpdateForwarder getServerUrlConnection IBM Tivoli Monitoring TEC Synchronization netcoolserver.gulfsoft.com IP Default port 3661 is being used by Web Services.
2009.06.03 16:24:09.703-04:00 com.tivoli.candlenet.SituationUpdateForwarder sendEvent IBM Tivoli Monitoring TEC Synchronization netcoolserver.gulfsoft.com IP Entry
Additionally, you should have no lines data in the C:\IBM\SitForwarder\persistence\situpdate_* file.
What it Looks like When Things are Wrong
In my case, I was acknowledging an event that was sent from ITM to Omnibus BEFORE I got the SUF configured, so the correct EIF Probe rules were not in place. These lines were in the persistence file:
Here's an example of the lines in the log file when I had this problem:
2009.06.03 16:22:49.376-04:00 com.tivoli.candlenet.SituationUpdateForwarder formatEvent IBM Tivoli Monitoring TEC Synchronization netcoolserver.gulfsoft.com IP SOAP string: sysadminxxxxxNT_Invalid_Logon_Attemptwebappprod
2009.06.03 16:22:49.376-04:00 com.tivoli.candlenet.SituationUpdateForwarder pollCacheFile IBM Tivoli Monitoring TEC Synchronization netcoolserver.gulfsoft.com IP Exception while processing cache file: null
2009.06.03 16:22:49.376-04:00 com.tivoli.candlenet.SituationUpdateForwarder pollCacheFile IBM Tivoli Monitoring TEC Synchronization netcoolserver.gulfsoft.com IP java.lang.NullPointerException at com.tivoli.candlenet.SituationUpdateForwarder.sendEvent(Unknown Source) at com.tivoli.candlenet.SituationUpdateForwarder.pollCacheFile(Unknown Source) at com.tivoli.candlenet.SituationUpdateForwarder.poll(Unknown Source) at com.tivoli.candlenet.SituationUpdateForwarder.main(Unknown Source) at com.tivoli.candlenet.W32Service$SUFRunnable.run(Unknown Source) at java.lang.Thread.run(Thread.java:568)
Notice that there are no lines stating that the event is being sent.
BIRT Report library is a place where you can store report elements such as Datasource information, datasets, parameters and styles and use them across multiple reports. When you change the information in the libraries, the changes are automatically reflected in the reports.
Why Libraries are so useful?
Say for example, you have about 10 reports using information from Tivoli data warehouse and suddenly the database password changes. Without the library, you will need to update the userid/password in the datasources defined in the 10 reports. Instead if you created the datasource at the library and shared it across the 10 reports, then you just need to update the userid/password in the library. Which one do you like?
How can I create and use libraries?
In BIRT, you can create a library using File->New->Library. Creating any report component in library is the same as creating them in a normal report design. To use the library, goto your report design file, goto library explorer and right click the newly created .rptlibrary file and select Use Library. This option will be available only if the library is not already in use (See the picture above).
Now, all the resoures created in the library are available for your report design. Just drag and drop necessary elements from library explorer to your data explorer.
How do I create a same look-and-feel for all my reports?
Create a master page in the library and share it across your reports. Also define styles in the library using your own custom theme and use the theme across your reports. To use the library master page in your reports, go to the XML Source for the report design. Look for the line containing something like the following.
Assuming your library master page is named GBSMasterPage and your library is named GBS, replace the above line with the following.
simple-master-page name="Simple MasterPage" id="2" extends="GBS.GBSMasterPage" Now, your report design uses the same look-and-feel defined in the library.
I hope this article gives you enough information to get started on the BIRT report libraries. If you have any questions, please feel free to post your comments.
I get a few people that I know asking about backup solutions for home, so I thought I would put document what I use and works well for me.
What I needed was a solution that would allow for the following: 1. backup multiple iterations 2. allow for centralized backup for multiple computers 3. simple to use (I am a simple person)
Now I know you all are going, "of course you went with a Tivoli product", but I downloaded the trial and was quite pleased with how it worked and did the tasks I needed it to do.
Here are some screen shots
This is the Start page for TCDP. I have meshed together the flyouts for the My Files, Local Storage and Remote Storage to show some more info.
The General Settings (Accessed from My Files flyout > Settings) allow for some configuration options such as where to backup locally, how many iterations and how much space to use.
In the Files to Protect settings, you can set the files/directories to include and exclude.
Email protection will allow for some various email programs for backup.
Remote Storage allows for TCDP to backup files to a remote storage device. In my case it is the DLINK NAS as listed above.
Advanced Settings allow further configuration to tune TCDP
As files are modified, TCDP will back them up locally and remotely (if available). Below is the Report feature that shows the image files I used for this blog being backed up. The popup in the screen occurs when you click on the Date/Time for the row that you want to see to provide more detail.
I really have not noticed any performance impact, but you also have to look at what is being backed up. I made sure to exclude any of the VMWare extensions and a few others that I know I do not want backed up. This is just like setting exclusions for Antivirus software :)
The restore is also quite simple and will allow for selection either from the local or remote source. When restoring, you have the option of restoring to the original location or to a new location. I would put screen shots for the restore steps, but this one is getting long enough already.
The backup and restore does work, and works well, I tested it out recently after someone had their drive crash with all their pictures. I wanted to make sure this worked!
Now the only issue I have with it is that there is not currently a linux client, which may or may not be a problem for you. It is not a big deal for me as anything linux I have does not really require a backup solution.
For the longest time, I have been visiting the IBM FTP site looking for patches that have recently become available. This is especially true when I am waiting for one to come out that I am expecting. If anyone else has done this, then you know how much fun that is. I am on the various emails that let you know when patches are released, but these seem to have no rhyme or reason on when they are run or what they report on. The best source seems to be the FTP site.
Recently I decided to do something I have been meaning to do for the longest time and that is write a simple script that would connect to the ftp site and find any recently released patches. In order to use this script there are a couple modifications that will need to be done. I have kept all the variables in the Initialize subroutine in order to make these modifications easier.
Variables: SMTP Server - This will need to be modified to supply any smtp server. $gMailDomain = "";
Sender address - Whatever the address you want the "From" field to use $gSenderAddr = "\@";
Recipient - Address to send the listing to $gToAddr = "\@";
Note: to send to multiple addresses, just comma delimit: $gToAddr = "name1\@domain.com, name2\@domain";
Also there is a variable to specify the number of days to look back for patch updates. Just set the global variable $gDayDiff to the number of days you want to look back for updates.
When the script is executed, it will create a file called updates.html (name can be modified by changing the global variable $gHtmlFile). This file is then used as input into the email.
This script does have a requirement for the Mail::Sender module. If you do not want to receive the emails, then comment out the following lines use Mail::Sender SendMail(); The entire SendMail subroutine
The last file states the encryption used, which tells you which ncw_*_crypt command to run (this stanza is directly above the ObjectServer hostname):
< !-- ! Login information to access the datasource specified in ! . ! - encrypted : If true, the password is encrypted (using nco_g_crypt) ! - algorithm (optional) : [AES|FIPS] ! If set to AES and encrypted attribute is set to true, ! the password is encrypted (using ncw_aes_crypt). ! If set to FIPS and encrypted attribute is set to true, ! the password is encrypted (using ncw_fips_crypt). !-->
At Pulse 2009 IV Blankenship gave a short session on Integration Impact with ITM via Web Services. I recorded the video and have posted it to youtube.com.
If you have been using the "tacmd createnode" to deploy agents in the past, you are in for a pleasant surprise in ITM 6.2.1! IBM added few welcome changes to the above command. These new features not only makes the deployment easier, they enable you keep track of agent deployment like you'd do in sophisticated products like ITCM. This article discusses the new features in detail.
Background Execution
If you invoke the tacmd createnode with the usual parameters (remote system name, user and password), it will NOT hang until the agent deployed as it was before. Instead, it will give you a transaction ID and return back control. Kinda similar to "winstsp" command in ITCM. Are you already seeing some ITCM like behavior? Wait there is more! To get the status of the deployment, use the new tacmd subcommand, "tacmd getdeploystatus". It lists all the distributions you have done so far and their status. A sample output is shown below.
Transaction ID : 12292212812729130001281138021
Command : INSTALL
Status : SUCCESS
Retries : 0
TEMS Name : VSITM621WIN
Target Hostname: 192.168.162.169
Platform : WINNT
Product : NT
Version : 062100000
Error Message : KDY2065I: The node creation operation was a success.
Batch Deployment
ITM 6.2.1 "tacmd createnode" supports batch deployment of agents. For example, you can create a deployment group named AppServers, add all appservers to that group and send deployment to them using single tacmd createnode command. There are new additions to subcommands viz. tacmd creategroup, tacmd addgroupmember and tacmd deletegroupmember to manage groups and its members.
Workspaces
To keep track of all your agent deployments, ITM 6.2.1 adds new workspaces to TEPS at the Enterprise level. The workspace provides a summary of all your deployments including number of agents Succeeded, Failed, Progress, etc, similar to MDist2 Console. There is also another workspace called "Deployment Status Summary By Transaction" providing status of deployments by Transaction ID. A sample Workspace view is shown below.
Remote Execution
One other subtle difference documented is that you can execute "tacmd createnode" from anywhere and you don't have to be logged on to TEMS server.
These feature additions are steps in the right direction for managing agent deployment and I hope you will find the features helpful.
I also had to do something similar in Windows, which turns out to be much simpler by using the VMWare Converter. Unfortunately this is not supported for Linux. The one thing that got me thinking though is that Windows can increase from a single drive and not have to use a separate drive. So why could I not do this in Linux?
The reason I needed to do this was for the new version of TPM (7.1). I originally had my VM set up with 20GB allocated, but the new version now requires approximately 50Gb to install, so the steps below are what I used to increase the LVM for my TPM install.
Here is my setup: VM Ware: VMWare Server 2.0.0 Host OS: Windows 2003 SE SP2 x64 Guest OS: Red Hat ES4 U5
Increase VM Disk Size Use the VMWare tool vmware-vdiskmanager.exe to increase the size
C:\Program Files (x86)\VMware\VMware Server>vmware-vdiskmanager.exe -x 50GB "f:\ VM_Images\VM TPM7.1 RH\rhes4srv01\Red Hat Enterprise Linux 4.vmdk" Disk expansion completed successfully.
Use fdisk to create new partition Even though the previous step reports that more disk was added, it still is not recognized by the OS.
Current file system: df Filesystem 1K-blocks Used Available Use% Mounted on /dev/mapper/VolGroup00-LogVol00 19448516 1964128 16496436 11% / /dev/sda1 101086 13232 82635 14% /boot none 257208 0 257208 0% /dev/shm
1. Enter the FDISK utility fdisk /dev/sda
2. Print the existing partition table Command (m for help): p
Disk /dev/sda: 53.6 GB, 53687091200 bytes 255 heads, 63 sectors/track, 6527 cylinders Units = cylinders of 16065 * 512 = 8225280 bytes
Device Boot Start End Blocks Id System /dev/sda1 * 1 13 104391 83 Linux /dev/sda2 14 2610 20860402+ 8e Linux LVM
3. Create new partition. This will be a Primary partition and is the 3rd partition. For the cylimder values, press enter to accept the defaults
Command (m for help): n Command action e extended p primary partition (1-4) p Partition number (1-4): 3 First cylinder (2611-6527, default 2611): Using default value 2611 Last cylinder or +size or +sizeM or +sizeK (2611-6527, default 6527): Using default value 6527
4. Set the Partition type to Linux LVM (hex 8e) Command (m for help): t Partition number (1-4): 3 Hex code (type L to list codes): 8e Changed system type of partition 3 to 8e (Linux LVM)
5. Print the Partition table again to see the new partition Command (m for help): p
Disk /dev/sda: 53.6 GB, 53687091200 bytes 255 heads, 63 sectors/track, 6527 cylinders Units = cylinders of 16065 * 512 = 8225280 bytes
Device Boot Start End Blocks Id System /dev/sda1 * 1 13 104391 83 Linux /dev/sda2 14 2610 20860402+ 8e Linux LVM /dev/sda3 2611 6527 31463302+ 8e Linux LVM
6. Write the new partition information Command (m for help): w The partition table has been altered!
Calling ioctl() to re-read partition table.
WARNING: Re-reading the partition table failed with error 16: Device or resource busy. The kernel still uses the old table. The new table will be used at the next reboot. Syncing disks.
7. Reboot
Create the Logical Volume Now that the partition is created, the physical and logical volume needs to be created
1. Create the Physical Volume - use the new partition information from the df command. In this case the new partition is /dev/sda3 pvcreate /dev/sda3 Physical volume "/dev/sda3" successfully created
2. Add the new Physical Volume to the Logical Volume vgextend VolGroup00 /dev/sda3 Volume group "VolGroup00" successfully extended
3. Extend the Logical Volume.
vgdisplay --- Volume group --- VG Name VolGroup00 System ID Format lvm2 Metadata Areas 2 Metadata Sequence No 4 VG Access read/write VG Status resizable MAX LV 0 Cur LV 2 Open LV 2 Max PV 0 Cur PV 2 Act PV 2 VG Size 49.88 GB PE Size 32.00 MB Total PE 1596 Alloc PE / Size 635 / 19.84 GB Free PE / Size 961 / 30.03 GB VG UUID bzOq45-o5yO-ruYY-Ffx1-DxCx-2e2j-ardXtu
lvextend -L +30.03G /dev/VolGroup00/LogVol00 Rounding up size to full physical extent 30.03 GB Extending logical volume LogVol00 to 48.88 GB Logical volume LogVol00 successfully resized
Note: The lvextend can either use the value of the Free PE from the vgdisplay command or the command lvextend -l +100%FREE /dev/VolGroup00/LogVol00. I found out about the %FREE after, so I did not test this.
4. Extend the filesystem The resize2fs does not work for this situation. The command ext2online will allow for the disk to be resized while disk is still mounted. ext2online /dev/VolGroup00/LogVol00
5. View the new file system df Filesystem 1K-blocks Used Available Use% Mounted on /dev/mapper/VolGroup00-LogVol00 50444996 1972848 45911716 5% / /dev/sda1 101086 13232 82635 14% /boot none 1825828 0 1825828 0% /dev/shm
And there is a system with a nice large drive. Hope this helps you.
After checking out TPM 7.1 for a little while, I thought I would post some of my observations on this new version.
Downloads Get ready for another big download. To download the media for Windows, it was approximately 15GB. I also downloaded the Linux media, but really they do share a bunch between the various OS installs, so this was only another 5GB. The IBM document for downloading is located at http://www-01.ibm.com/support/docview.wss?uid=swg24020532
Installation For now, I have only done the Windows based install as I was more interested in the actual product usage rather than fighting with an install at this time. Little did I know that the install would be a bit of a fight.
I decided to go with the default install for now just to get it up and running. So I brought up my trusty Windows 2003 SP2 VM image and started to prep it for the installation. Since the disk requirements were more than I allocated to my C drive, I created a new drive and allocated 50GB for an E drive. I then extracted the images to the E drive and started installing. After a few pages of entering information, I started to get failures. After checking around and asking IBM support, it turns out the default install is only supported on one volume (this is in the documentation, but not really clear as I was installing everything on one “volume”, the E drive). So I had to increase the C drive space (thanks to VMware Converter) and start again. After that the install went fine. It took about 5 hours to complete.
Start Up Starting TPM is not much different than it was in the 5.x versions. There is a nice little icon to start and stop TPM. The only issue I had is that the TDS (Tivoli Directory Server) does not start automatically. This means that you cannot log in! You have to manually start the TDS service. I am sure that this has something to do with startup prereqs, but have not investigated right now.
New User Interface Because I have used TSRM (Tivoli Service Request Manager), the interface was not that foreign to me, but still way different than the 5.x interface. I find that it is not as fluid as the old interface but is way more powerful and flexible. With a proper layout, I am sure that it can be way easier to navigate than 5.x.
One thing that does bug me is that Internet Explorer is the only supported browser. I have been using Firefox and everything seems to work fine except for the reports (could be just my setup)
The new interface has tabs which are called Start Center Templates. These start Centers can be setup to provide shortcuts into the application that are specific to the function of the user. So if you have someone that is an inventory specialist, you can create a layout that will provide quick access to everything they need to perform their job rather than displaying what they do not need like workflows and security. A user/group can also be assigned multiple Start Center templates. This is useful for using existing templates created for various job functions and providing them to a user whose role spreads multiple areas.
Start Center - Default Provisioning Administrator
Discovery There is something new called a Discovery Wizard. These wizards can perform multiple functions for discovery rather than the one step discovery (RXA discovery or inventory). For example, one wizard is called Computer Discovery, Common Agent Installation and Inventory Discovery. This discovery does exactly what it says. The first step will be to discover the computer using the RXA discovery, then once that is completed, install the TCA on the discovered systems, and then do an inventory scan of the systems. Worked pretty nice. The only issue I had is that the default setting for the TCA is to enable the SDI-SAP. This means that in order to perform the inventory scan, the SDI environment needs to be configured first. Either that, or change the global variable TCA.Create.EO.SAP to false.
Computer General Information
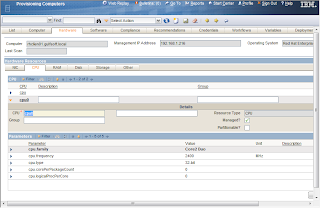
Computer Hardware Information (CPU)
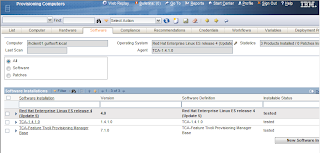
Computer Software Information
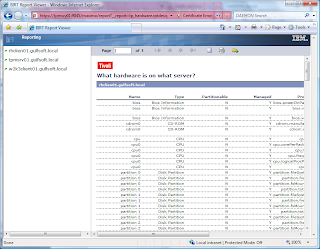
Reporting Reporting for 7.1 is WAY different than 5.x. TPM now uses BIRT to provide reporting instead of the DB2 Alphablox. Now there is good and bad with this new reporting method. The bad thing is that it is quite a bit more complex than the 5.x reports. The 5.x was pretty simple to use and create a report. The good thing is that BIRT is quite a bit more flexible and is being standardized across the various Tivoli products (Tivoli Common Reporting is BIRT with WebSphere) so the experience from one product can be shared across all.
Another note is that reports are no longer used for the dynamic groups. Dynamic groups use something called a query (I think I will follow-up on this in a future blog).
Sample Report – What Hardware is installed on what server
General Comments
The new version of TPM is looking very promising. The interface is very flexible/customizable, which is something that the old interface was not. The old interface did seem to flow a bit better by allowing the opening of new windows and tabs by right clicking on an object. This is not something that can be done in the new interface. The old one was specifically designed for the job it had to do, but really could not do much more, where the new interface will allow for the ability to expand beyond just TPM functions. This new interface is the same one shared by TSRM, TAMIT, TADDM and many other Maximo products.
Now we just need to see what will happen with the new version of TPMfSW (possibly named TDM or Tivoli Desktop Manager) to see what the full direction will be. One other thing that I know is on the list is the new TCA. This was something that I was hoping would be squeaked in (it was not promised for this release) but hopefully the 7.1.1 release will.
If you have any comments or questions, please fire them off and I will see what I can do to answer them.
This question keeps coming up in the TME10 list so I thought I would go through a couple methods that I have used. You can determine which one you want to use for your environment.
Note: This is mainly looking from a Windows endpoint perspective, but easy enough to apply to any OS.
Using wadminep By making use of the wadminep command, you can issue a sequence of commands to delete the lcf.dat file and restart the endpoint with new configuration settings. The two arguments to use are remove_file and reexec_lcfd. These can be wrapped in a script (sh, perl) and executed against one or many targets. This method is easiest to implement, but is probably slower as it processes on endpoint at a time.
The basic steps are wadminep remove_file lcf.dat wadminep reexec_lcfd -g "<gateway_name>+<gateway_port>"
You can either hard code the gateway name and port, or make these variables.
Using a software package It is possible to create a software package that can be distributed to the targets to perform the same basic functions of the wadminep commands. The good thing with the software distribution method is that you can hit more targets at the same time and also use the MDIST2 features to help with the distribution (result info, timeouts, bandwidth, etc).
The only issue with using a software package is that you cannot just run a script that stops and starts the endpoint. If you run a script that stops the endpoint, it will also stop the script from executing and it will result in either an interrupted or failed state. To work around this issue, the package will need to execute a script that will spawn a new script and release. Since the spawned script will execute right away, a delay is needed, which is where the sleep command comes in handy.
This package will consist of 2 batch files and the sleep command. The sleep command may need to be included as this is not available on all Windows systems.
Batch File 1 - start_mig_ep.bat This script will remove the old dat file from the endpoint and then spawn the restart_ep.bat script
===================================================================== @echo off
call "%SYSTEMROOT%\Tivoli\lcf\1\lcf_env.cmd"
REM Create backup directory in case the endpoitn needs to be moved back to the old TMR if not exist "%LCF_DATDIR%\mig_bak" mkdir "%LCF_DATDIR%\mig_bak"
REM move the LCF files if exist "%LCF_DATDIR%\lcf.dat" move /y "%LCF_DATDIR%\lcf.dat" "%LCF_DATDIR%\mig_bak\lcf.dat" if exist "%LCF_DATDIR%\lcfd.log" move /y "%LCF_DATDIR%\lcfd.log" "%LCF_DATDIR%\mig_bak\lcfd.log"
REM Delete the bak/bk files. In some newer versions of endpoint, these files are created del /f/q "%LCF_DATDIR%\*.bk" del /f/q "%LCF_DATDIR%\*.bak"
Batch File 2 - restart_ep.bat This file will use sleep to give some time for the endpoint to report that it is completed and then continue with the endpoint restart. When the endpoint is restarted, the gateway parameter will be passed with a gateway from the new TMR.
===================================================================== @echo off
echo setting sleep for 30 seconds > "$(target_dir)\restart_ep.log"
REM Stop the lcfd call net stop lcfd >> "$(target_dir)\restart_ep.log"
REM Start the lcfd call net start lcfd "/g$(gw_name)+9494" "/d3" >> "$(target_dir)\restart_ep.log" =====================================================================
Once the scripts are created, the software package can be created to send the files to the target and then execute the start_mig_ep.bat script. Some notes on the software package that will be required: 1. Variables will be required for the scripts - target_dir: used as the destination for where the files will be sent and the script executed from. I have set this to be a subdirectory of the Tivoli endpoint install location. This is done using the environment variable LCF_DATDIR (case sensitive if on UNIX). The value I used is $(LCF_DATDIR)\..\..\..\temp (if installed in C:\Tivoli\lcf\dat\1, this would be C:\Tivoli\temp)
- gw_name: used to define the gateway to be used in the distribution. This will allow for different distributions to be sent to different gateways. This could be the ip address, short name or FQDN.
2. Use of the substitute variables. Each of the scripts have the Tivoli variables in them. In order for the scripts to be updated, the Substitute Variables checkbox needs to be checked. This is in the advanced file properties for the files.
package name = migrate_ep title = "No title" version = 1.0 web_view_mode = hidden undoable = o committable = o history_reset = n save_default_variables = n creation_time = "2009-01-14 10:00:00" last_modification_time = "2009-01-14 10:00:00"
default_variables target_dir = $(LCF_DATDIR)\..\..\..\temp gw_name = gateway_name end
move_removing_host = y no_check_source_host = y lenient_distribution = y default_operation = install server_mode = all,force operation_mode = not_transactional post_notice = n before_as_uid = 0 skip_non_zero = n after_as_uid = 0 no_chk_on_rm = y versioning_type = swd package_type = refresh sharing_control = none stop_on_failure = y
add_directory stop_on_failure = y add = y replace_if_existing = y replace_if_newer = n remove_if_modified = n location = C:\CID\SRC name = migrate_ep translate = n destination = $(target_dir) descend_dirs = n remove_empty_dirs = y is_shared = n remove_extraneous = n substitute_variables = y unix_owner = root unix_user_id = 0 unix_group_id = 0 preserve_unix = n create_dirs = y remote = n compute_crc = n verify_crc = n delta_compressible = d temporary = n is_signature = n compression_method = deflated rename_if_locked = y
add_file replace_if_existing = y replace_if_newer = n remove_if_modified = n name = sleep.exe translate = n destination = sleep.exe remove_empty_dirs = y is_shared = n remove_extraneous = n substitute_variables = y unix_owner = root unix_user_id = 0 unix_group_id = 0 preserve_unix = n create_dirs = y remote = n compute_crc = n verify_crc = n delta_compressible = d temporary = n is_signature = n compression_method = deflated rename_if_locked = y end
add_file replace_if_existing = y replace_if_newer = n remove_if_modified = n name = restart_ep.bat translate = n destination = restart_ep.bat remove_empty_dirs = y is_shared = n remove_extraneous = n substitute_variables = y unix_owner = root unix_user_id = 0 unix_group_id = 0 preserve_unix = n create_dirs = y remote = n compute_crc = n verify_crc = n delta_compressible = d temporary = n is_signature = n compression_method = deflated rename_if_locked = y end
add_file replace_if_existing = y replace_if_newer = n remove_if_modified = n name = start_mig_ep.bat translate = n destination = start_mig_ep.bat remove_empty_dirs = y is_shared = n remove_extraneous = n substitute_variables = y unix_owner = root unix_user_id = 0 unix_group_id = 0 preserve_unix = n create_dirs = y remote = n compute_crc = n verify_crc = n delta_compressible = d temporary = n is_signature = n compression_method = deflated rename_if_locked = y end
end
execute_user_program caption = "Execute migrate batch file" transactional = n
during_install path = $(target_dir)\start_mig_ep.bat inhibit_parsing = n timeout = 300 unix_user_id = 0 unix_group_id = 0 user_input_required = n output_file = $(target_dir)\start_mig_ep_out.log error_file = $(target_dir)\start_mig_ep_err.log output_file_append = n error_file_append = n reporting_stdout_on_server = n reporting_stderr_on_server = n max_stdout_size = 10000 max_stderr_size = 10000 bootable = n retry = 1
ITM provides system uptime monitoring out-of-the box. You just have to select the uptime attribute and you can use the attribute in situation formula. It is that simple. Okay, what if you want to monitor the system downtime? It may sound like little difficult but with Universal Agent it is possible to guage this value with a simple MDL and script combination. This article explains how to do it. It also provides an example how to use some of the Time functions of UA.
How does it work?
To calculate downtime, we need to write a simple script that outputs the current date and time and the previous value of the date and time. We use the UA to get the capture these values. So, how do we get the previous value? UA provides this feature out-of-the box and it is documented! Just use the environment variable $PREV_VALUE in your script. Unfortunately this value is not persistent across UA restarts, so your script should store the last time it ran in a file somewhere. You can also use the UA functions to convert the script output to ITM timestamp. So after this, you will get Current Time, the previous time the script ran as attributes in the portal. You can write a simple situation that uses Time Delta function to calculate the difference between the two times and alert.
MDL
A Simple MDL listing is given below. It is given as an example only. Perform your own testing to ensure its working.
Here is a sample shell script that retrieves current and prev time stamp values.
#!/bin/sh
# Latest Timestamp
current_value=`date "+%m/%d/%Y %H:%M:%S"`
# If the PREV_VALUE exists, displays current and prev values,
# else retrieve PREV_VALUE from persistent file
if [ "x$PREV_VALUE" != 'x' ]
then
echo $current_value $PREV_VALUE
else
prev_value=`cat /tmp/downtime.txt`
echo $current_value $prev_value
fi
# finally, store the current timestamp in persistent file
echo $current_value > /tmp/downtime.txt
Drawbacks
Does this solution provide accurate downtime estimate? No, it doesn't. For example you may get potential false alerts if the UA goes down for some reason. Also, it provides the time difference between the script last ran and script's latest run not exactly the time between system reboots. But these are minor drawbacks to live with!
Questions, comments? Please feel free to post them.


 Start Center - Default Provisioning Administrator
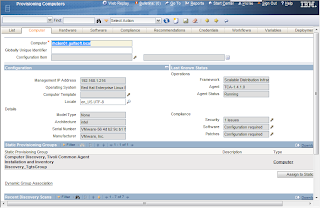
 Start Center - Default Provisioning Administrator


